Showing posts with label Nelson Amos. Show all posts

Monday, 10 August 2020

Building a 13 Course Lute, Start to Finish, 21: Fitting and Shaping the Bass Rider; Gluing in the Peg Box

Hello friends--welcome back to the ongoing tale of a 13 course lute. In our last episode, I fitted the pegbox, and glued and carved-in the chanterelle tuner. Today, I shall finish the pegbox installation by making, fitting and carving the bass rider, and then gluing the completed peg box into the neck.

I make the bass rider of quarter-sawn pear, the same material that I've used for the peg box and the chanterelle tuner. The piece I've selected is a couple of millimetres thicker than the finished dimension. There's enough material in this piece for two bass riders, so I'll trace them out back-to-back and rough in both at the same time.

My template has locations for peg holes and for some larger radii within the pattern that I will drill out with forstner bits.

I've screwed my blank down to a backing plate for a couple of reasons. First, I have to be able to drill through the material and into something beneath, so that the drill won't splinter out the backside of the piece. Second, I want to be able to clamp and hold the piece securely so it doesn't become a nasty out-of-control helicopter when I start drilling (I've seen it happen.)

The backing board is clamped securely to the drill press table.

The pear is pretty tough material, and there's a lot of thickness to get through. To ease the stress on both the drill press and the bit, I take small cuts and lift the bit up frequently, and rub wax on the sides of the bit.

With all the peg holes and radii drilled, I use a coping saw to remove material from the teardrop cutout.

Then I can cut out one of the blanks on the band saw, and get to work shaping it in the swivel vise. I use a chisel to shape most of the outer profile, cutting in from both sides across the width of the piece. For the cutout, I use knives and a small gouge. 

The overall shape looks pretty good for now. I've used my template to mark the approximate depth of the inside of the pegbox, and the approximate contours of the sides and foot.

Now it's time to fit up the peg box temporarily, and see how the bass rider should align on it. This is my basic gluing rig for peg boxes (you'll see it in action when I glue the peg box at the end of this post.)
I have a fairly good idea of how the bass rider fits on the peg box of the original Schelle lute in Paris, since I'm working with some very nice photographs of that instrument taken by Grant Tomlinson (as you'll see below.) However, I still need to clamp it to the peg box and stretch a string from the bridge to check its alignment, in both the horizontal and vertical axes, and adjust the position as needed.
One of the great advantages of the Schelle peg box-bass rider combination is that, unlike other peg box-bass rider pairs of the era, this one does not slope to the side. Instead, because the peg box is made over-wide and extends out the bass side about 10mm, the bass rider sits in direct alignment with the bass side peg box cheek, and there is virtually no torque being applied by the 12th and 13th course strings. In my experience it's a much more stable arrangement than some other examples I can name--one being the 13c Burkholtzer in the Vienna KHM. I've never personally examined the Burkholtzer lute, but from the photos below I get the impression that the bass rider may have drifted outward somewhat over the years.

Photo by Robert Lundberg, JLSA XXXII, 1999, p.42

Photo by Stephen Gottlieb, courtesy Grant Tomlinson
Perhaps I'm wrong and it hasn't moved a hair since it was built, but in any case it seems to me that such an arrangement is very vulnerable, an accident waiting to happen. Such an accident did, in fact, happen to an instrument based on the Burkholtzer belonging to a friend of mine, and he sent it to me to fix. My repair involved figuring out a way of removing the bass rider's tilt and straightening it out to improve its strength, somewhat like the Schelle bass rider. You can read about my solution to the problem here:  A Bass Rider Fix, For Nelson. 

Back to the task at hand. With the bass rider clamped to the peg box and aligned carefully, I am able to mark out locations both on the peg box cheek and the bottom of the bass rider. Then I can lay out the basic contours of the cheeks, and start carving out the recess.

I set up the rider in a portable vise in the drill press, and drill a number of holes to a certain depth.

I remove most of the material with gouges.

Eventually I can work with small flat chisels to square up the sides and bottom.

I also cut and file a small channel, into which the nut will eventually be fit.

Then I remove as much excess material as possible, with flat chisels, gouges and knives. (It's much easier to do in the vise than after it's glued onto the peg box!)  
The small violinmaker's knife with a curved blade allows for very good control when removing material. (Notice the little piece of dowel, which makes the bass rider a lot easier to hold in the vise.)

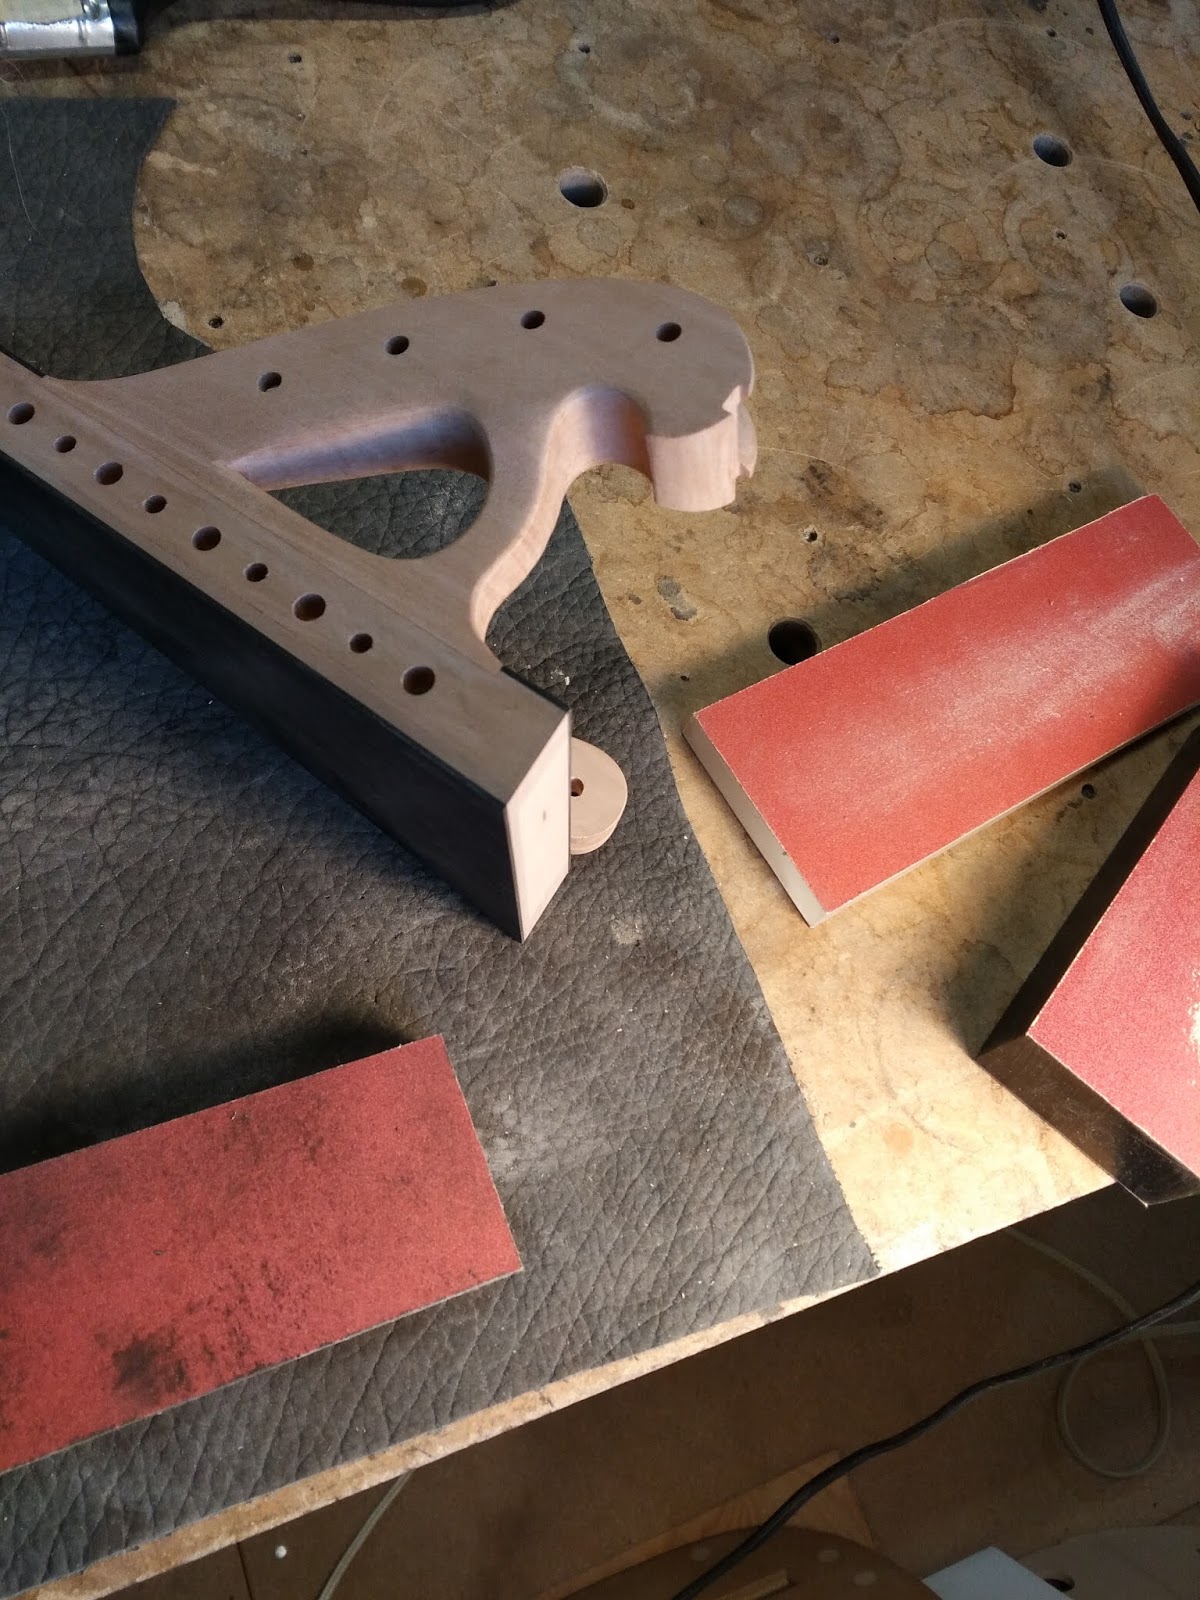
There's my working shape--I've still got a ways to go, but I think it's good for gluing in.

Fitting the bass rider into the peg box is a lot like fitting the chanterelle tuner, which I described in last week's episode: the slot is about 2.5mm deep, with the front edge square to the cheek, and the back edge angled slightly. I have chiseled out this area by hand, but will run over it with my dremel router and then clean it up with files and a chisel. (The block of wood inside the peg box provides a flat surface for the router to ride on.)

With the channel cut and the rider fitted into it, I can check the alignment one more time before gluing up.

Here's my nylon fishing line stretched from the position of the 12th course octave on the bridge. I know how far away I want that string to be from the 11th course bass string, and I know how high I want it to be in relation to the nut slot on the rider. This alignment looks good to me--I'm going to heat up my glue, and get this bass rider glued into the peg box.

Here are all the pieces. Along with three c-clamps, I've got a small piece of spruce to protect the front of the foot, and a small shaped caul that fits in the back end of the rider. There's also a thick piece of spruce on the back of the peg box, to protect it during clamping.

The length of the foot means that unlike the chanterelle tuner, the bass rider needs to be clamped in place.

When the glue has dried and I've cleared the excess away next morning, I can carve the piece in. I hold it on a piece of leather in my lap and work mainly with the small, curved-blade violinmaker's knife across the grain. 

I like the textured surface I get with that knife--it allows me to see the developing shape pretty clearly, and I can get a good overall form before moving on to finishing tools.
The tools I use for that part of the process are a set of Japanese finger rasps from Lee Valley Tools; fine files; and small curved scrapers.
I like the finger rasps--they cut well but aren't too aggressive, and leave a nice surface that can be finished with scrapers.

Here's my result: I think it's an elegant shape. The front leg needs to balance lightness with strength, as do the cheeks, and the width of the rider must gracefully taper to width of the peg box cheek into which it's glued. In addition, that teardrop cutaway wants elegant curves and well-chamfered edges (and I quite like the way it mimics, a little, the shape of the chanterelle tuner on the far side of the peg box.)
It's a lot of fun to sit down and carve something like this, and actually figure out the shape of the thing by doing it. It's a process of continual discovery, a period of intense looking and observing--turning the thing in your hands, adjusting the light source, seeing how the curves and recurves work and evolve, trying to get a sense of the overall visual and physical balance. It's a very satisfying experience, one of the most satisfying of my whole lute making practice.

Of course, I'm greatly assisted in this work by the set of photographs I have of the Paris Schelle, some of which you see in the photo above. These were taken by Grant Tomlinson on one of his European research trips in the 1970s and 1980s. It's been my privilege throughout my professional career as a lute maker to have had ready access to Grant's entire collection of his photographs of historical lutes. I've also benefitted immensely by having access to the notes Grant wrote on those trips for all the lutes that he examined. He looked at instruments in museum collections in England, France, Italy, Germany, Belgium; dozens and dozens of instruments altogether, a real treasure trove of information. Many of the dimensions of the lute I'm telling you about building were adapted from measurements that Grant took in his travels. And, of course, the photos are extremely helpful in puzzling out shapes and details. I owe Grant a ton; I owe Grant a house.

Let me ask you a question. After reading that last paragraph, are you not the least bit jealous of me, and the access I've had to all this wonderful information about historical lutes?

Well, you needn't be. At least, you'll only have to be jealous of me for a little while longer. A few years ago, Grant approached the Lute Society of America and offered to give it his archive: hundreds of photos, and hundreds of pages of hand-written notes, on dozens and dozens of historical lutes. The LSA accepted, and for a few years now, Grant and Phil Rukavina, the LSA's web master, have been toiling away at scanning the pages of Grant's notebook, digitizing photo negatives (many of which had never been printed before), and getting the results up online. I know that it's been a great deal of work, for both of them, and I know that not quite all the work is done yet. However... a little bird has told me that the work is finally nearing completion, and in a little while, the whole world of lute makers will have access to this invaluable resource. I don't yet have a date, but when the launch happens, I will let you know. So please stay tuned.

But enough talk! Back to lute making. What's left to do is get this peg box, with all its encrustations, onto the neck of the lute.

I've sized a number of times, with hot glue size, the base of the peg box, and the rebate for the peg box in the neck of the lute. When that size has dried--next morning--I re-flatten the peg box and re-fit it in the rebate. 
My final fit. I'll warm up my glue, and get set up.

Here's my peg box gluing jig: just a piece of ply with cork lining the underside, and an angled block screwed on. I use the jig for pretty much all my peg box gluing jobs--depending on the lute, I'll swap out the block for one with a different angle. I also need to adjust the distance of the block from the end of the neck, again, depending on the lute.

This is pretty much the whole set-up. Four cam clamps on the back end of the jig, one up near the peg box rebate. That should be enough clamping pressure to keep the thing from pulling forward when I glue in the peg box and put clamps on it.

One feature I might draw your attention to here is the pair of wedges I've placed between the edges of the jig and the edges of the neck. I need them because of the fingerboard's rather extreme curvature. (If I use this jig on a renaissance lute, the flatter fingerboard means I don't need the wedges.) 

This is the basic posture of the instrument when I glue on the peg box--belly-down on the bench pad, propped up on the stems of the cam clamps. By the time I get the peg box on and a couple of ratchet clamps in place, the lute will be a little end-heavy. I've found that the best way to keep it from tipping over--and at the same time protect the lute from any mishap--is just to lay on pieces of fabric. I have a green velvet piece on the back, topped with a folded sheet of heavy green fabric (which I once used for a photo backdrop.) I'll probably put some towels on top of that too, just to be on the safe side.

To locate the peg box for gluing, I hold it accurately in place and press a piece of 1/2" masking tape over the front of the joint, from the bottom block of the peg box down onto the end of the neck. I will then take a small, sharp knife and cut that piece of masking tape in two, exactly at the joint. When I glue up, I will be able to align the peg box by aligning the edges of the bisected piece of tape.

This is one of the dry runs I do to work out details before gluing up. In a minute, I'll take of the clamps, then check my glue. If it's hot and the right consistency, I'll heat both the peg box base and the rebate with the hair dryer, then brush hot glue on both. Quickly but calmly I'll place the peg box in the rebate, and rub it side to side ever so slightly, bringing the locator tapes into exact alignment. Then I'll place one cam clamp, and snug it, then the other, and then snug both. And that will be that. 

I look for good glue squeeze-out all around the joint. I will also paint some hot glue around all the edges of the joint, so that the glue, as it cools and contracts, will help to pull the two sides of the joint together. (I've used this technique many times during construction; see, for instance, gluing on the neck, in episode 4.)

I think the fitting and gluing went very well, and I'm looking forward to coming in tomorrow morning, cleaning up the excess glue, and seeing how things look. There are a few more little jobs to do before finishing out the peg box and neck, and I will tell you all about them next time. 


Saturday, 29 September 2018

A Bass Rider Fix, for Nelson

Hi everybody--it's been a while. Hope you all had a fine summer. Mine was great: plenty of time relaxing, holidaying, swimming in rivers, lakes and oceans (a major summer pastime with Julia and I), as well as a little time to finish up a new crop of instruments. I'll talk about those in a future post, but for today, I want to tell you about a small repair job I did back in early July.

The last week of June I attended the Lute Society of America's LuteFest in Cleveland. As always, the LuteFest was a lot of fun. It was nice to meet up with old friends again, and make some new ones--it's always great to see new people excited about the lute!

And, of course, it was great to be able to spend an afternoon wandering the galleries at the Cleveland Museum of Art. You never know what you might find there....

The Atrium, view from my table at lunch, the Cleveland Museum of Art

One old friend and client I met up with at the LuteFest was Nelson Amos. I've made him a couple of lutes over the years (and fixed one of them for him too), and our paths seem to continually cross in lots of interesting ways. Toward the end of the week, Nelson asked me if I could have a look at his 13 course lute, one that was not made by me but by a now-retired lute maker in the Pacific Northwest.

The problem: the bass rider had been knocked off. Dang!


This lute had been a topic of conversation and debate at Andy Rutherford's Lute Doctor repair shop during the week at the LuteFest. It was pretty obvious that the rider couldn't just be stuck back on with glue: this had been tried once already, prior to the LuteFest, and had failed. Part of the problem was the angle of the bass rider. As on the original Burkholtzer lute (Vienna KHM SAM 44, upon which this lute is based), it leans over the bass side of the pegbox at a pretty steep angle. The arrangement seems to work fine as long as the bass rider is whole and strong (and made from a stout piece of wood), but under string tension, the broken-and-glued bass rider didn't stand a chance, and toppled over.

Here are a couple of pictures showing the rather extreme angle of the bass rider on the original Burkholtzer lute. I have no idea what kind of magic spell is keeping it in place, but I doubt the museum keeps much tension on the strings these days...

Photo by Stephen Gottlieb, Courtesy Grant Tomlinson


Photo Robert Lundberg, JLSA XXXII, 1999, p.42


Various solutions to re-attach Nelson's bass rider were put forward: glue the rider on again, and reinforce it with pins inserted in holes drilled through the back of the peg box; build some kind of support attached to the treble side of the peg box; or replace the entire peg box and bass rider with something stronger and less leaning-over.

None of these suggestions seemed practical. It was hard to see how pins could be inserted to reinforce the joint--there's just not much material to drill into, and even if one could, it didn't seem likely that they would offer much support. Same problem with building a support from the treble side: where and how would it attach? What on earth would it look like? As for the third idea, replacing the pegbox and bass rider, that would work, but it would be very time-consuming and intrusive. It would eliminate a lot of nice work done by the original maker, and change the character of the lute completely.

At the end of LuteFest week I still had no solution, but we packed Nelson's lute, along with all our other lutes, into the van and headed back to the northern side of the border.

I was travelling that week with Wilma Van Berkel, a rising star in the lute making world who lives in London, Ontario, Canada. Wilma's been working with me periodically in my workshop in Vancouver for a number of years now as my protégé, and over the last few years we've developed the custom of working together on lute repairs at her workshop London in the week after the LuteFest. It's a good opportunity for her to gain experience doing lute repairs in a supported environment, and it's a good opportunity for both of us to to get a lot of lutes working again for players on the eastern side of the continent.

We took a couple of days to rest up, then got back to work. Wilma's first project was to re-attach a theorbo bridge that had flown off due to an impact.

Wilma, hard at work preparing the belly to re-glue the bridge

And mine was to get this bass rider back on. I still had no clear idea of what I was going to do to fix it, but I decided to go ahead and work carefully step-by-step, and trust that a solution would reveal itself as I went along.

The first step was to create two new good gluing surfaces, by planing away the broken sides of the joint--on the peg box cheek, and the bottom of the bass rider.


Once that was done, I pretty much knew how the repair would go--I would need to build some sort of ledge, or cantilever, off the side of the peg box for the rider to sit on. Once I had decided that, all I needed to do was make sure a) that it would be strong enough to hold under pressure, and b) that it would preserve as much as possible the original look of the lute.

I decided to affix a pear wood plate to the top of the peg box cheek. It's pretty substantial--about 8mm thick. You can see here that I drilled holes with a jeweller's pin vise through the plate, partway down into the cheek (being careful not to drill all the way through.) You can see one pin, a piece of bamboo dowel, in the upper hole, and I put one in the lower hole too. These pins help align the piece during gluing, and also provide added strength to the glued joint.


I carefully masked the cheek and padded the back of the peg box, so that I wouldn't damage it during gluing.


Once the plate was in place, I used my pin vise and bamboo dowels to locate the bass rider in the same way.


Front view


Back view


Before gluing up, I did a couple of things--I strung some fishing line from the bridge down to the bass rider, to make sure that it was aligned properly; and, I rounded over the inner edge of the plate (I figured it would be much easier to do this before the bass rider was glued on.)


When the fit and alignment were great, I glued up, and got some good clamping pressure.

Action shot of your humble narrator gluing on the rider courtesy of Wilma Van Berkel

Next morning, I got to work carving the plate to match the look of the bass rider.


As you can see, I also carved a bit of relief on the underside of the plate, up near the top: I needed to make sure there was enough room for the strings of the 10th and 11th courses (which wind onto pegs outside the peg box) to travel freely from the nut to the pegs.

I finished off the piece, then blackened it to match the surrounding work. I first inked it with some permanent black ink, then brushed on a number of layers of very thin shellac mixed with lamp black. Here's a final look:

And a view from head-on:


As you can see, the angle of the bass rider is now much closer to parallel with the 12th and 13th course strings, so there's a lot less torque on the bass rider, and a lot less tendency to pull to the side. When I strung up the lute, I was prepared to see some deflection to the bass side under tension, but there was very little. It looked like the bass rider was secure.


As I said above, my other aim in this repair was to try to preserve as much as possible the original look of the lute. I think I did that. There is, of course, an extra chunk of wood on this lute now, and the bass rider no longer sits at its original daredevil angle; but that was the trade-off necessary to get a good lute working again, with minimal fuss, and minimal intrusion.


So, there was one more lute back in action--and for the time being, I felt satisfied. I bade farewell to Wilma, who had by this time moved on to an archlute repair, and flew to Montreal to join Julia for some holiday adventures. There were still some lutes back in my workshop in Vancouver, lutes so close to being finished that I could almost hear them crying out--but they would have to wait a few weeks longer for their first breaths. I will tell you all about them in my next post.