Showing posts with label J.C. Hoffmann. Show all posts

Monday, 5 December 2016

New Work, and a Bit Unusual, Too

I see that it's been a very long while since I posted anything here about my new work.

I can't write about everything that's gone on in the shop over the past year, but I want to give some highlights that will show the kind of work I've been up to and the kind of challenges my clients have set for me. I want to talk specifically about two people, both of them excellent musicians who have very clear ideas about the kind of music they want to play, the kind of performing circumstances they'll encounter, and the kind of lute they need to fit the bill.

First up is Evan Plommer, of Sarnia, Ontario. This is the second lute that I've made for him, and just like the first, with this one he set me an interesting task. Again, he was looking for a 12 course lute to explore the world of accords nouveaux or 'transitional' tunings; this time out, he wanted a larger-bodied lute with a longer string length and lower pitch level to explore some deeper sonorities. (The lute has a string length of 79cm.)

Mug shots!


I think the body itself may have been the germ of this idea for Evan. It is that of a bass lute originally designed by Ray Nurse--he built an 8 course version of it a number of years ago, which Evan admired very much, so he asked me to design a 12 course lute around it. (The design is from a lute body dated 1589 by Magno Tieffenbrucker, in the Boston Museum of Fine Arts.) Ray kindly lent me the mold, and I completed the lute in the late autumn of 2015.

As you can see, the body has a quite flattened profile--Ray's concept in designing the bass lute with this shape was to enhance its projection. I think it works very well--the combination of string length, body shape, and the material of the back (11 ribs of honduras rosewood) give the lute a mellow yet robust tone.

One of the challenges of building a lute like this is the stepped extension. I've made a few of these lutes now, and I think I've found quite a secure way of attaching it--secure in the sense that it's not likely to separate from the neck unless there is some kind of impact (and let's just utter a small prayer right now that such an event will never come to pass), and secure in the sense that it doesn't bow an inordinate or unpredictable amount due to the tension of the strings. (I will share my method of attaching the extension in a future blog post, so stay tuned.)

I've found that this deflection due to string tension is more of a concern the bigger the lute gets. The string tension itself doesn't change much whether the lute is big or small. Instead, the problem seems to be that the longer the bass strings, the more room one must allow between the strings at the extension end of the lute so that they don't clash against each other when the basses are played.

The amount extra that one must allow between the courses is minute--less than 1mm extra for each course--but when it's added together over the four courses of the extension, it becomes a relatively substantial amount.  The main problem is that the more space there needs to be between courses, the more the extension must skew outward, that is, must point toward the bass side. The strings pull to the side, as well as forward, meaning there could be problems if the extension isn't built robustly and attached securely.

But everything seems fine so far, and the lute's been under tension for over a year. I hope to see it again sometime soon--I'd love to take some measurements and see how much the extension has deflected during that time.

On to the second player, and the second lute. The player is Ronn McFarlane, one of the best-known and best-loved lute players on the scene. I've been listening to Ronn for years, and enjoying his concerts and the classes on lute technique that he's taught at the Lute Society of America Summer Festivals. So it goes without saying that I was thrilled when he contacted me to see if I'd be interested in making him a new lute.

Now, I knew that Ronn had been playing one main lute for a lot of years--a 10 course that Ray Nurse built him I think in the early 2000s--and that it had been a long time since he'd commissioned a new lute. And indeed, once we started discussing the design features that Ronn wanted in this new lute, it became clear to me that he had done a lot of thinking about the kind of instrument that he would need in his career from this point forward. The result for me were a lot of small but crucial challenges in the design and the building of the lute.

Let's have a look first--then I'll tell you about some of those challenges.
 
This is a 10 course lute as well--I expect that this number of courses gives Ronn the maximum flexibility he needs to use the lute in all the different playing situations he encounters as a professional lutenist.

One of the main stipulations he had when we were initially talking about the design of the lute was the string length--59cm. As you may know, that is a fairly short string length for a 10 course lute. (My usual model for a 10 course lute tuned to g', a shrunken Tieffenbrucher C45, comes in at around 63-64cm.) Now, it's easy to find a model of renaissance lute with a string length of around 59cm--the 1592 Venere and the Hieber lute both come to mind--but a 10 course lute would not work on these models, for a couple of reasons. First, those bodies are a little too compact to handle 10 courses--they don't really have the resonant capacity to deal with all that sound. Second, their necks have room for only 8 tied frets--and Ronn was adamant that this 10 course lute have room for 9 tied frets (and he wanted the ninth to "tie easily," he said.)

So, that sent me back to the drawing board. The solution I came up with for a lute with a relatively large body, relatively long neck, and relatively short string length, was a Sellas archlute--the same small liuto attiorbato that I had used for the first 12 course lute that I made for Evan Plommer, in 2012.

As you can see in the pics above, the body of this lute is quite broad and short--almost as if the folks in the Sellas workshop in the early 17th century had taken the outline of a small-bodied 7 or 8 course lute, and just inserted a spacer or wedge in the middle to broaden it (Robert Lundberg talks about this  design concept in his book Historical Lute Construction.) At the same time, as you can see in this side view, the back of the body is quite flattened--which enhances sound projection, but also, fortunately, makes the lute more comfortable to hold and play.

Even with this rather squat body, however, getting the ninth fret to tie easily was a bit of a trick--I had to raise the position of the bridge by a few millimeters, and change slightly the profile of the lute's back, right where the middle ribs meet the back of the neck, making them gather in a slightly steeper curve. I got it to work, though--as you see here, a most relaxed ninth tied fret.
One other important design consideration was the peg box. Ronn is very much a travelling musician, and often that means he needs to be able to take his lute into the cabin of an airplane as hand luggage--and the case needs to fit into the overhead bin. A 10 course lute of the usual design has a long peg box, and a deep case to fit it--too deep for Ronn's needs. The solution: make a shorter peg box by having a chanterelle tuner, a main peg box that carries 7 double courses, and a bass overrider that carries courses 9 and 10.


As you may have noticed, the overrider is not based on any particular historical design. The idea of basing an overrider on some ancient 13 course lute where you'd normally find such a thing (an Edlinger, say, or JC Hoffmann) seemed quite anachronistic to me, so I followed Ray Nurse's lead in the lute that he build for Ronn in 2000: I designed a functional (and hopefully attractive and natural-looking) piece of equipment that will get the job done with a minimum of fuss.

Two final features to mention: I installed a set of Pegheds, the geared, mechanical tuning pegs; and I installed a K&K Pure Classic pickup inside the lute. Both were Ronn's special requests, and I consented to them without question.  The Pegheds make a lot of sense for Ronn's situation: I cannot imagine anyone playing a lute more, and needing to tune a lute more (and more quickly and accurately) than he does. As for the pickup, Ronn plays many gigs in many different situations--solo, with the Baltimore Consort, or with Ayreheart, electric or acoustic as the case may be. The pickup allows him maximum flexibility to use this new lute in any situation.

So that's it for me for this week. I 've suddenly realized that throughout this blog post I've been typing the words "Ray Nurse" quite a lot. Who is this mystery man, you may be asking? Well, I'm sure many of you have met him, or perhaps seen or heard his work--he's been an amazing lute maker, musician and scholar for many years. This is what he looks like, standing in the doorway of my little shop. Ladies and Gentlemen: Ray Nurse!

Sunday, 7 December 2014

The Lute Doctor Is In


Today I'd like to tell you about a fairly substantial--and quite successful--lute repair I did last summer, for Michael Miranda, of Alhambra, California.  The patient was a lovely 13 course baroque lute made in 1979 by Nico van der Waals; the case history and diagnosis were a little complicated.
Photo: Michael Miranda

Photo: Michael Miranda

Michael bought the lute in 2001, and though it was still in pretty good shape, it had obviously been well-used over its lifetime.  Then recently, he explained to me, it began to lose sustain and response in the treble range, and seemed as though it was becoming 'played out.'  He took it to a local luthier, who put a new belly on it, which worked fine for a time; but after a while the bridge pulled off, destroying the new belly in the process.  Michael then took it to another local luthier who put the old (original) belly back in, which also worked fine for a while, until the belly started to lift up and separate from the edge rib along the bass side.  Fearing catastrophe, Michael slackened all the strings, and the lute was rendered basically unplayable. 

Needless to say, by this point he was feeling a bit frustrated.  He first contacted Grant Tomlinson to see if he might repair the lute (if indeed it could be repaired, after all these misadventures), but Grant was busy and unable to take on the work, and so he passed it to me.  Grant was convinced that the lute could be fixed, and the best way to do it was to use the old belly--a very stiff, fine grained top, with a beautifully carved rose and an elegant bridge--but install a new set of bars.   Much else would need to be done to refurbish and stabilize the belly, as I would find out when I removed it from the body and had a closer look.
Photo: Michael Miranda
The first thing that came clear was that the reason why the the joint between the belly and body failed, was that the edge of the belly was just too chewed up to make good contact with the edge rib.  The belly had been removed many times during the life of the lute, and each time it was, the luthier's palette knife would chew up the edge just a little bit more.  By the time it got to me, there was barely a surface there left to glue.
So, besides replacing the bars, the edge of the belly would have to be rebuilt as well.  There were also numerous cracks--one below the bridge, and one extending from each of the fingerboard points--which would need to be stabilized and filled.
Photo: Michael Miranda
First things first: remove the old bars.  I cut most of the material away with a sharp knife, planed the remainder very close to the surface of the belly with a low-angle block plane, then removed the last remnants with a very sharp scraper.  Whatever had been used to stick the bars down originally, I was pretty sure it wasn't hide glue--some sort of yellow resin, perhaps carpenter's glue.  Whatever it was, it seemed to have deteriorated the material of the belly beneath the bars, turning the wood chalky.  I had to be very careful in removing this stuff, because although the belly was already quite thin (less than1.5mm in most areas), I would need to expose new wood for the new bars to be glued to, to ensure a solid joint.  I had to strike a fine balance here.

With the old bars gone, I could start the rebuilding process.  All along the edge of the belly I planed and scraped a bevel about an inch wide, and you can see in this photo how deep I've gone--nearly to the underside of the ebony half-binding.  You can also see--where the belly is chipped away, exposing the ebony--how badly damaged the belly was in this spot.


With the perimeter of the belly chamfered, I could now glue onto it new strong, close-grained belly material.  I used off-cuts from bellies of lutes I've recently built, and did the gluing in pieces: one on each side, one across the bottom, and one on the "tongue" of the belly.

And I used just about every 2-inch clamp I had in the shop.

Here's the result, with clamps and cauls removed.  Before I could carry on, I had to carefully plane the new wood down to the correct thickness (level with the old wood beside it), and close to the outline of the belly (that is, close to the ebony edge binding.)

Next up: repair the cracks in the soundboard.  In addition to one below the bridge, there were two long cracks extending from the tips of each of the fingerboard points, down almost as far as the large bar above the rose (so, about 3 to 4 inches long).  These cracks had been there for a long time, and were quite wide--the belly had apparently shrunk considerably over the years.  Because of this, the repair would have to be done in two stages: first stabilize the cracks on the underside of the belly, then fill the cracks themselves from the top side.

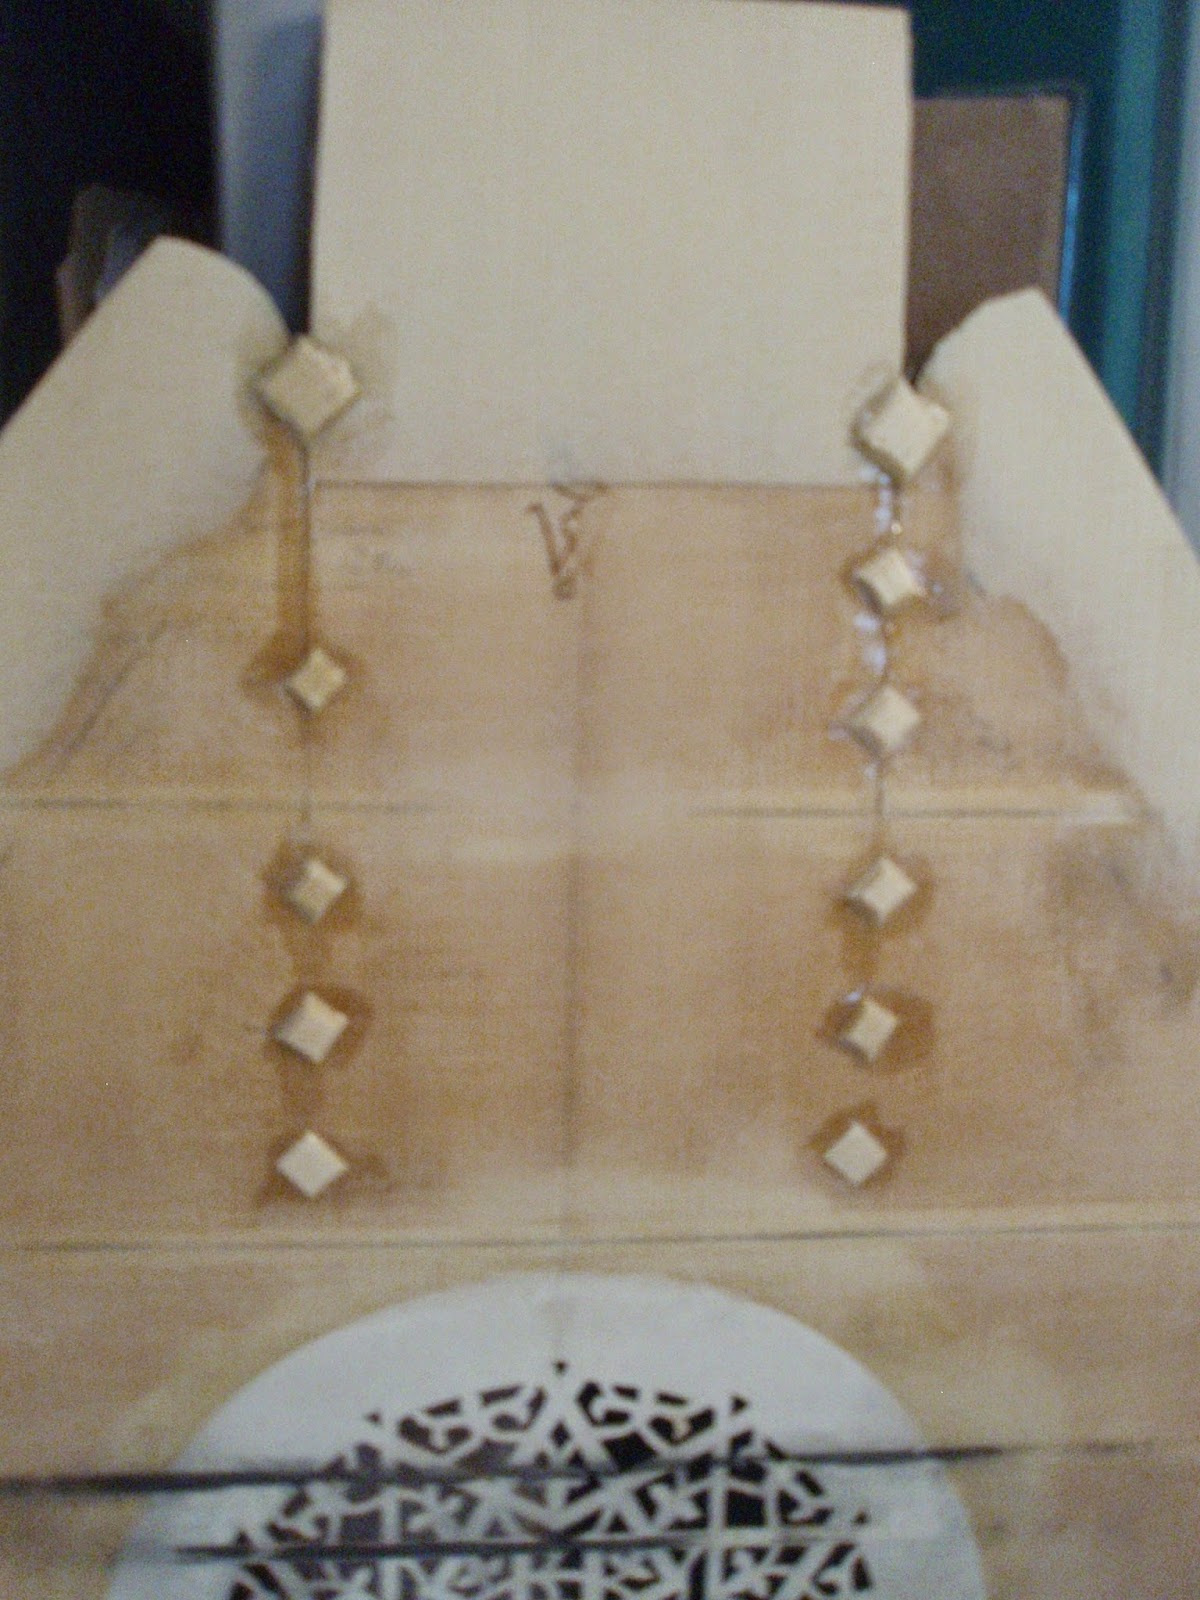
I glued small diamond patches of spruce soundboard material over the cracks, at intervals (and avoided placing them where any new bars would eventually go.)  As you can see, these cracks were long, and I tried to follow them right to their ends, and deal with their entire lengths, so that they would not open up again later on.

On the top side, I used a sharp knife to actually widen the cracks a little, to make them a more-or-less uniform width along their entire length, and make them into a more deliberately v-shaped channel.  That way, I could shape a long, v-shaped patch of soundboard material that would fit closely and fill the entire channel without gaps on either side.  I glued the patches into place with hide glue, which is perfect for this kind of repair: since it shrinks as it dries, it has a tendency to actually pull the patch material down into the crack, for an even tighter fit. 
I scraped the patches flush, and as you can see, removed a bit of the soundboard's patina in the process.  The patches themselves are also quite a bit lighter in colour than the old belly material.  I later coloured these areas a little with some very thin varnish, and though they won't fade away completely (at least not for a few years), they won't be that noticeable, especially with a rank of 13 courses of strings above them.  In any case, they will certainly be preferable to the cracks that they replaced.

The final stage of rebuilding the belly was to create and glue on a new set of bars.  The instrument was based on a 13 course lute by J.C. Hoffmann (which, if I hadn't recognized it, was helpfully written on the top block by the maker!), so I consulted some historical belly drawings of lutes by Hoffmann, selected some of my heaviest, stiffest bar material, and shaped a new set of bars and glued them on.

I want to show you a shot of the bars as they're being glued on, in the go-bar deck.  You'll notice that the belly is sitting up on a platform; I wouldn't normally use this for gluing on bars, but I did in this case because this belly already has a bridge glued to it, and the platform has a cutout that the bridge fits down into.

Here's a shot of the completed belly, showing the new bars contoured along the tops and trimmed to length, the diamond patches on the cracks, and the new belly material scarf-joined to the outer edges of the belly.  This soundboard is now very solid, has a beautiful, ringing tap-tone, and is ready to be glued back into the body of the lute.
Which I did.  The fit was good: the outline of the belly matched very well with the body, and most importantly, the gluing surface of the belly matched very snugly against the outside rib.  There would be no more problems with the belly lifting away from the body.

One last bit of work was in order: a new set of fingerboard points.  With those cracks having been repaired, the belly was now slightly wider in that area than it had been before, and the old points no longer fit.  With new points in place, the repair was now complete.
See?  You hardly even notice the filled soundboard cracks, once the lute's strung up.
And there we are--the completed repair.  I thought it turned out rather well.  It seemed to have a good, solid, sweet tone; I hoped it would be an improvement over the sound it had before, though I had no way of knowing, since it had been unplayable when I received it.  I shipped the lute back to Michael in August, and eagerly awaited his assessment.  I got an email a few days later.  Here's what it said:

Hi Travis,

It’s a miracle - You’ve brought my lute back to life!! I’ve restrung it, and have slowly brought it up to pitch. The sound is even better than when I first purchased it over 10 years ago. Many, many thanks for your expertise and attention to detail. I look forward to seeing you next summer and will be in touch soon regarding the Vancouver lute fest. All your beers are on me!


take care,


Michael


I just love it when I hear things like this from people I've made or repaired lutes for--it truly makes my day (and I don't just mean the "all your beers are on me" part, though that's nice too.)  I really get a kick out of making lutes work, and not just my own lutes, but lutes by other makers.  I've worked as the Lute Doctor at the LSA's Vancouver Lute Workshop for the last few years, and I've had occasion to fix a few.  Some repairs are large and some are small, but whether I'm simply adjusting the action to make the lute a bit more comfortable to play, or undertaking larger-scale fixes like this one, the process of doing repairs, and seeing the immediate results they can have for players, is very rewarding.

Some lute makers hate doing repairs, and cringe at the very mention.  Not me; I like doing them (in moderation), and I don't mind who hears it.  If there are repairs to be done, I'll schedule them in between batches of my own lutes that I'm working on, just to give myself a little bit of variety at the bench.  You can learn a lot by doing repairs, and one important thing you can learn is to be fearless.  If a lute has been built, it can be unbuilt; whatever is broken can be fixed.  These are principles that doing lute repairs has taught me, and they're principles that I apply in my own lute making practice, every day in my workshop.