Hello friends, and welcome back to the blog series wherein I detail the historically-informed process of building of a 13 course lute with a body after Magno Tieffenbrucher, and a pegbox/ bass rider arrangement after Sebastian Schelle. This is the 23rd instalment, and the penultimate chapter in our story (I've always wanted to use the word 'penultimate' in a sentence unironically, and I think I may have just done it.) So that means that if I've planned my work and executed well, the next instalment, episode 24, will detail the stringing, and playing, of a completed lute.
To get to that point, I need to fit nuts and pegs on this lute. Both jobs are large and contain multitudes; so let us begin.
Fitting the nuts
There are two nuts on this lute, one on the bass rider and another at the end of the neck. Let's begin with the main nut.
I lay the long straightedge down the line of the first course from the bridge to the nut, to confirm the string length and the width of the nut. I don't think it would matter if the string length varied by a millimetre or two either way (though it won't--I've measured this string length dozens of times by now), but I do want a nut that is approximately 8mm from front edge to back. This looks very close to that number.
I need to cut the nut slot only partway across the width of the neck, which I do with a series of cuts made with my shop-made dremel router base. I've clamped a block of wood on top of the fingerboard--actually, it's the caul I used to glue on the fingerboard, in episode 15 of this series--and will use it as a fence for the router base to ride against. The masking tape is to keep the fingerboard from being scratched by the base as I push it across.
Here's the router, in position and ready to work. Bear in mind that though the fingerboard has a pretty pronounced curve, I want to create a nut slot that has a flat bottom. By making a number of shallow passes, and concentrating the cut toward the middle of the slot, I can create a channel that's flat enough to finish off with hand tools.
There's the rough result, to be finalized with chisels and files. As you see, the nut slot is actually going to be pretty shallow in comparison to the depth of the fingerboard and spacer piece beneath it. The length of the nut is determined by the width of the string band: the bass-side edge of the nut will be about 2mm outside the 11th course bass string.
When finishing up the slot, I want the bottom surface very flat and square to the vertical edge (which is itself also very flat.) It's hard to put a straight edge on these surfaces to get a look, so I approach the problem from a different direction: I flatten the bottom and one adjacent edge of the nut blank, and use the nut itself to test the slot for flatness and squareness.
I rub the nut on a sanding block to get the final flatness.
There are my flat, squared sides. I'll also dock the edge between them lightly with a file, so that the nut isn't held out by the inner corner of the nut slot.
When I try the nut in the slot, I look at all surfaces and how they meet, making sure the nut doesn't rock on any high spots or ride over any gaps. I also make sure that the surfaces are perpendicular by checking if the nut will rock forward or back. When it's all snugly fitted, I square up the bass-side end to fit that corner of the slot as well.
Then I hold it in place, and mark the underside. I'll cut off the excess along the back edge and treble side with the band saw; then I'll true up the edges with a disk sander and sanding block.
Next step is to mark the approximate string height above the fingerboard. I put a 1.3mm spacer in front of the nut, and trace all the way across it with a sharp, hard pencil.
These two curved parallel lines represent the level of the fingerboard, and the approximate top of the nut 1.3mm above it.
I now want to shape the top of the nut fairly close to that 1.3mm line, so I fit it into a jig to use with the disk sander. It's just a piece of hardwood with a notch cut in the end, and I use double-sided tape to stick the nut into the slot.
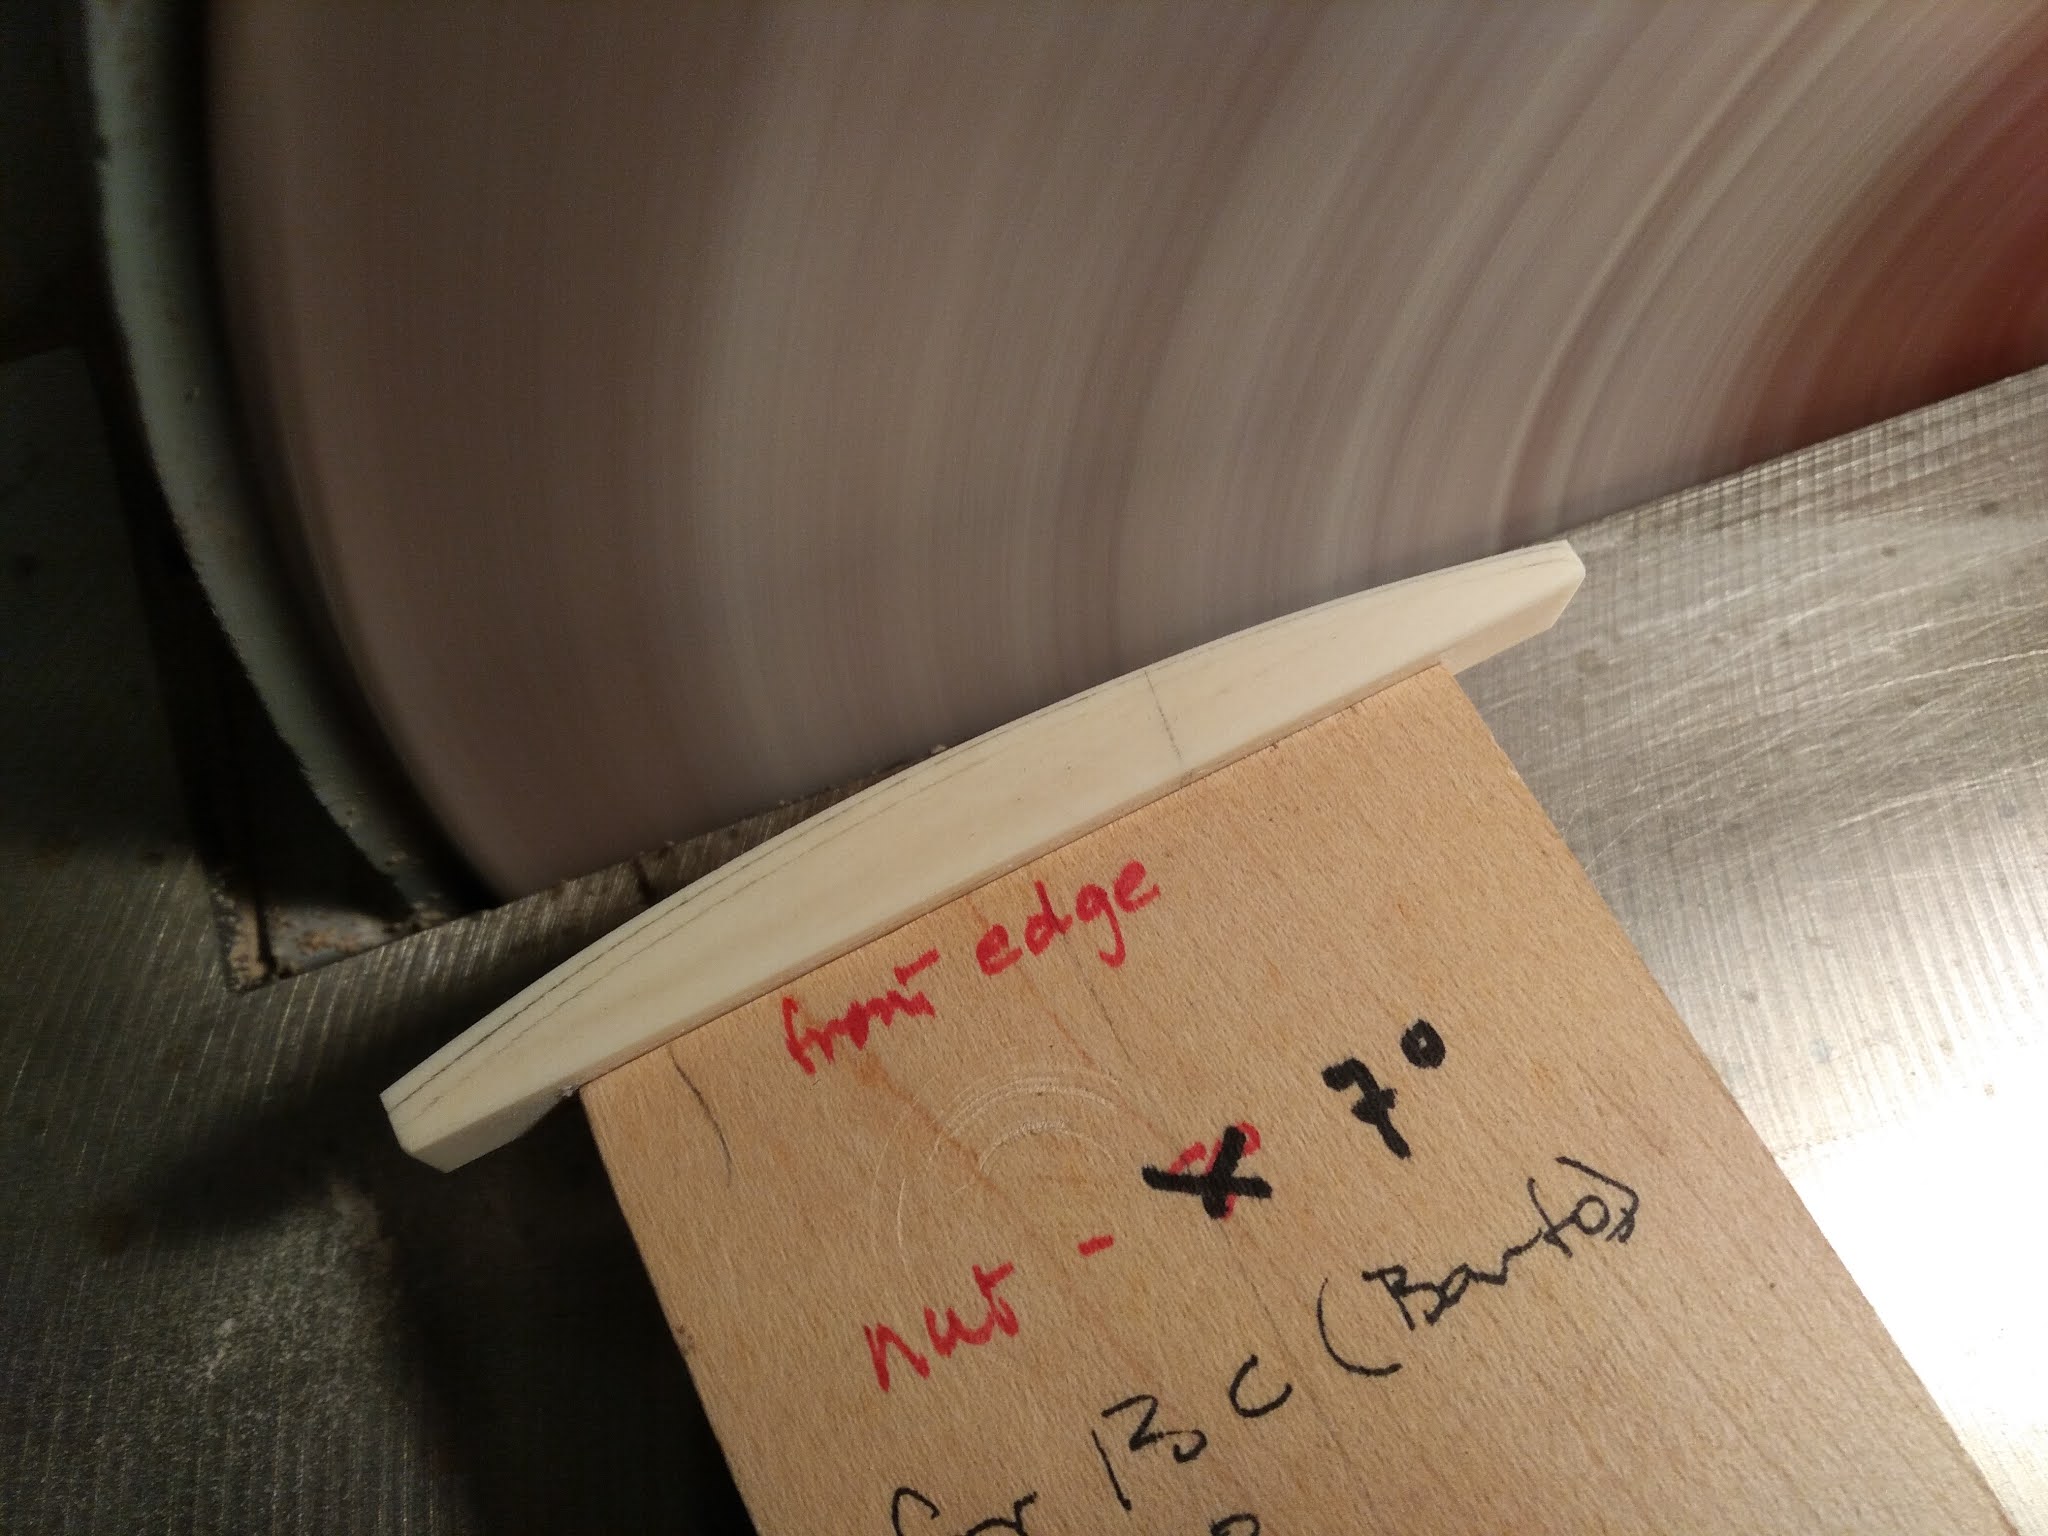
Then I adjust the sander table to 7°, which is the slope that I want on the top of the nut.
This is about where I want to stop sanding. I've got a good general shape on the top of the nut, but I've also left it a bit higher than my 1.3mm line--a couple of tenths on the treble side, widening to maybe half a millimetre on the bass. It's best not to lower the nut too much at this stage; after I've put strings on the lute, I will be able to lower it very precisely.
I use a coarse file, followed by finer files, to put a healthy quarter-round shape on the back side of the nut. I will also refine this shape after I've installed strings on the lute.
There's the main nut, ready for action. For the time being I've left the outside treble edge sharp and square, which helps when I'm laying out the positions of the strings. I will round off and smooth that corner after stringing is complete.
The nut on the bass rider is a fairly simple thing to make. I've already cut and shaped the slot when I made the bass rider, so all that's needed is to shape the nut to fit it.
I'll leave this nut oversize in height and length for the time being. I've sanded an angle of about 10° into the top.
Fitting the pegs
At the risk of stating the extremely obvious, before I can fit the pegs I need to make them.
Actually, I made a set of pegs for this lute long ago--a few months back, at about the time I made the bridge--which would be about the time of episode 10. I made them then for a few reasons. First, I like to get peg making done early because it creates a fair bit of dust, and I don't want it interfering with, say, the varnishing process (which might otherwise seem a logical time to turn pegs.) Second, making them alongside bridges means that I can dye both bridges and pegs black at the same time. Though this lute's bridge was not dyed, the ones I made for the other two lutes in this group were; so that's a small efficiency. Third, I like to make them early because if for any reason the new pegs want to change shape--twist, or bow, or go oval in cross section, for instance, as can happen to a piece of wood that's newly shaped--they will have ample time to do it. I always make spares when I turn a set of pegs, and when the time comes to fit them on the lute I can reject any bad ones, and use the remaining ones with confidence.
Because I vowed at the beginning of this series to document all the major steps of constructing this lute, I would now like to take you back in time a few months, and describe the process of making a set of pegs.
Actually, let's go back a little further than that.
Our story begins a few years ago, when I obtained a plank of Castello boxwood, Calycophyllum multiflorum. This South American wood is not a true boxwood, but nonetheless it's a very good wood for pegs--it turns well, dyes well, is dimensionally quite stable, and matches nicely the hardness of the pear wood that I use for my peg box cheeks. I've used it for years with excellent results.
Every few years, during the regular course of resawing various woods for use in my shop, I cut up a plank like this into slabs about 12mm thick, which I stash in the rafters and let season for as long as possible.
Then once a year or so, when my stock of peg blanks gets low, I bring some of those strips down and cut them up. I use a pattern to lay out the blanks, following the grain of the piece and laying out different lengths to use the wood most efficiently.
I keep them sorted in this bin until I'm ready to turn.
And when I'm ready to turn pegs, like I was last fall, I go next door and ask Grant Tomlinson if I can borrow his dedicated peg-turning lathe. Here it is, in all its grandeur.
Truly, it's a wonderful machine, and I am tremendously privileged to be able to use it. Before coming to Vancouver to work in residence with Grant in 2009-2010 (generously supported by a grant from the Canada Council for the Arts), I made a number of lutes with pegs that I turned by hand, on a Shop Smith Mark V from the 1960s. It was a bit more work, but I got pretty fast at it, and got a good result. But a dedicated peg lathe is a sweet thing to have access to.
I took a number of shots of my peg turning process, but I think now that instead of showing you a lot of still photos, and painstakingly describing each step, I'll kill a whole flock of birds with one stone by sharing a short video. (That didn't sound so nice--maybe I'll just use the stone to frighten them.)
This is a demonstration of peg turning on this pattern lathe that Grant and I did about three years ago, for a different project. In this video Grant turns a peg for an 8 course lute. For this baroque lute I used a different pattern for the peg head, but otherwise the process of turning the peg is pretty much identical. Please enjoy.
A couple of days at the peg making lathe gives me a pile of pegs that looks like this:
The ones at the bottom of the photo are freshly-made; the ones at the top have had their faces shaped.
First with a chisel, to remove the bulk of material...
...And then with a knife, to get a more subtle recurve and satisfying grip.
I dock the edges with small files...
And also use them to shape the bobble on top.
A party of pegs! All ready for decking out in their best black-tie.
My logwood-ferrous sulphate dye bath--identical to the one I used in the previous episode of this series to dye the peg box cheeks, bass rider and chanterelle tuner.
There are three sets of pegs here, for the three different lutes in this group.
It works well to heat the dye, then pour it over the pegs.
I lay the pegs out to dry between coats of dye and mordant.
I wash the dyed pegs and let them dry thoroughly before finishing their heads (and only the heads, not the shafts) with a coat of T&T oil. And then, I put all the pegs in a tray, and put the tray on a high shelf--and let them sleep for a few months, until they're needed.
Which brings us neatly back to the present day. Here we go with fitting pegs.
I use a piece of 220 sandpaper, backed with a piece of leather, to remove much of the free dyestuff from the shaft of the peg (which can otherwise make the peg a little sticky.)
I apply even pressure while twisting and pulling the peg.
Here's my set, with spares for each part: main peg box, chanterelle tuner, bass rider.
Tools of the trade: large and small reamers; a bar of dry hand soap; a soft brush; a 15 cm rule; a bamboo skewer. I've selected the best pegs of the bunch, and laid them out in order.
I apply the hand soap liberally to my reamer before using it, and throughout the reaming process.
I don't have to go too far before the reamer packs up with shavings between the cutter blades. I clear the channels with the bamboo skewer, apply more soap, and continue reaming.
I rub soap on the peg to lubricate it each time I try the fit in the hole--and because I don't want to merrily ream too large a hole in the peg box, I try-fit the peg early and often in the reaming process.
I like the look of the way this peg is fitting. The contact area on the big end of the shaft is nice and evenly shiny all the way around, while on the small end it's a bit less shiny. This means that the peg is gripping mostly on the big end, which will keep it from binding and twisting (and being very difficult to tune) when a string is finally wound on it.
For the time being, I fit all the pegs about 10mm from their final position.
I do this preliminary fitting cautiously just in case I encounter something like this--a flat spot on one side of the big end (and it looks like small end as well) of the peg. Actually, there is often a matching flat spot on the opposite side of the peg, which means that the peg has gone slightly oval since I turned, dyed and finished it.
Rather than pitch it into the bin of lost causes, I correct the fit by carefully filing away the shiny, high spots on both the big and small ends. I rub more soap on the peg, and try fitting it; and I will keep correcting the shape of the peg until it is perfectly round, and the big end is a little shinier than the small end.
Like so.
I do a preliminary fit of all the pegs on one side of the main box, then remove them, and do all of the pegs on the other, and remove them, then lay them all out in order. I'm now ready to do the fine fit.
For most of the last 5 millimetres or so of fit, I turn the reamer backwards, so that instead of cutting, the reamer's blades are compressing and burnishing the peg hole. The main reason for this is that the peg hole is made more 'finished' and durable--so that I can seat the peg where I want and with the fit I want (please see above), and the peg won't easily press further in and change that fit. It's also a benefit that seating pegs this way takes longer--many more turns with the reamer burnishing than with cutting. This means I can set the pegs a very accurate distance from the pegbox cheek.
Like so: I want 12 mm to the collar, and about 35 to the end of the peg. As I go down the cheek fitting pegs closer to the tip, I will gradually shorten the distance by 1mm.
I mark the positions of the string holes--about 5mm from the wall of the peg box, on the big-end side.
I then mark where I want to cut off the end of the peg, by making one knife cut straight down then another cut from the side, show here, to form a small notch.
Like so.
The notch makes a very handy spot to seat my gent's saw to cut off the excess.
The same jig as in the pic above, turned tip-up in the vice, makes a handy holder for filing the tip of the peg end.
I like to put a crown of about 0.5 mm on the tip of the peg.
I black the tip with a permanent felt pen, then hit it with a spot of T&T oil.
While I wait for that to dry, I lightly chamfer the peg holes. A round grinding stone for a dremel tool works fine for this job.
It is now time to drill string holes in the pegs. My peg holder keeps them organized, and I can write the diameters of the bits I want to use, and stroke them off as I drill the holes.
My little holder (made of softwood, with a hole reamed through it) is quite secure, and backs up the drill so the hole won't break out on the bottom side.
A small but important detail: to chamfer the edges of the string holes.
So strings will not be bitten off!
A very, very final detail in fitting pegs is that I give the reamer a twist or two (backward, burnishing) in each hole to seat the peg 0.5 mm further in--so that the edges of the crowned tip of each peg sit flush with the peg box cheek. I think it gives a nice, finished look.
And that is all, for the penultimate chapter in this story of a lute (it might be the longest penultimate chapter ever written; it's certainly the longest penultimate chapter of anything I've ever written.) There's a lot of detail here; it takes a lot of concentration to get through all these stages when making a lute, just as it does to get through all these stages when writing about making a lute. One cannot afford to lose focus in either realm. I hope to see you for the next instalment, the ultimate, concerning the fretting, stringing and playing of the lute, which promises to be as dense with detail as this one. In the meantime, please be well!


