Saturday 30 November 2019

Building a 13 Course Lute, Start to Finish, 9: Fine-fitting the belly, Locating the Bridge

Hi there, friends. This time out, as the sign says, I'm going to talk about fine-fitting the belly into the waiting body of this 13 course lute, and then locating the bridge. I've already done a 'rough' fit of the belly, by doing a preliminary trimming of the bar ends; now I'm going to get down to the business of giving this lute a sweet shape that corresponds to the outline that I drew on the belly a couple of episodes back, before I glued on the braces.

Just before I do, could I ask a small favour? I get a few comments and questions regarding these blog posts. Some--though very few--appear in the actual comments section of the blog; most have come to me either through social media, personal messaging, or email. The favour is this: if you have a question or comment, would you mind leaving it on the blog, in the comments section below? I'm happy to answer, but I would prefer to do it here, so that those questions and answers become part of the post, to clarify, correct, or otherwise comment on it--for the benefit of all readers.

(There's no reason to be embarrassed to ask a question, but if you'd rather not use your real name, please feel free to use a pirate name or your luchador alias. Your secret's safe with Google.)

On with the show.

As you might recall, when I initially cut off the bar ends I left them a bit long, on purpose. It's difficult to saw the bar off at exactly the right spot on the first go, so that the length of the bar and the angle of the cutoff are both correct. I leave them a bit long, so that I may trim them more carefully, using a small chisel rather than a saw.

To figure out exactly how much to trim them, I need to fit the body down over those bar ends. So, the first thing I need to do is remove the false belly, which I do simply by slipping a palette knife around the false belly edge, separating it from the rib where I originally spot-glued it with weak size.

I then set the edge rib carefully down against the ends of the bars. The photo below shows how I hold and view the work, though I haven't quite got the edge rib all the way down yet (that's one of the problems with using a camera with tripod and 8-second timer--I don't always get the event staged exactly as I want to.)

Imagine about one second into the future: the edge of the rib will be down against the belly, and the ends of the bars will be resting against the inside surface of the edge rib. I can then take a sharp, soft pencil, and make a mark on the belly, right against the rib, opposite each of the bar ends.

Please keep in mind that during this process, I'm not attempting to press the entire outline of the lute down over the bar ends (since the all the bars are over-long, it won't actually fit.) Instead, I do it in three sections. In the photo above, I'm working with the bass side. When I've made marks for all of the bar ends there, I'll turn everything around and mark the treble side. Finally, I'll work with the bottom of the body, and mark out the bar and tab ends there.

Here's a well-focussed photograph of my knee. Actually, what I meant to show here is how I hold the edge rib against one of the tabs on the bottom of the belly while I make my mark.

Here's what I get when I lift the body away--a pencil mark outside the drawn body outline that shows me exactly how much I need to trim this tab. 


And so I trim it, using a small chisel (1/4", with the handle cut off--perfect for small operations like this.) On the upper left corner of the photo, sitting on the edge of the bench you see a little jar of water and a brush: if I dab the end of the bar with a bit of water, the chisel cuts through the end-grain a lot more cleanly and easily.

When I get close to the outline, I start fitting the body down all around and looking carefully at the way the edge ribs curve. I want a smooth outline, so if I see a bar end that needs a little trimming, I'll take the time to do it. (Even a small adjustment can make a big difference to a graceful shape.) I also carefully flex the edge rib against each bar end, to feel whether the angle of the bar-end cutoff matches the true angle of the rib.

When the bar ends are trimmed and the outline looks good, I tape the belly securely into the body with masking tape. I make sure at this point that I've really located the belly carefully, by matching body and belly centrelines at the bottom, and neck edges (marked on the belly) at the top.
Now I'll move onto the next step in the process: locating the position of the bridge on the belly. I want to do this very accurately, because I'm finding and marking the exact spot where I want to glue the bridge.

Most of the time during the working process, I protect the sharp veneered edges of the neck by covering them with masking tape. However, right now I want to see the edge of the neck clearly, because that's one of the crucial references I use to locate the bridge. I've rolled back the masking tape, and there it is.
When I originally lay out the shape of the lute on my working drawing, I have a very clear idea how far I want the first string to lie from the edge of the neck (which, essentially, is also the edge of the fingerboard.) This distance is very important for the playability of the instrument--and anyone who has ever tried to play a lute with a first string that's too close to the edge of the fingerboard will know what I mean. The distance can vary a little bit, according to a few factors--the length of the neck, for instance, or the preferences of a client who's a very experienced player--but whatever those factors are, I want to have them worked out completely before I start building the lute.

So, I have the edge of the neck, and I have the position of the chanterelle in relation to it. This means I should be able to run a straightedge down that line, and somewhere along it will be the location of the first course on the bridge. But where? And what will be the angle of the bridge in relation to the first course?

The clearest and most foolproof way for me to find this out is just to set my layout drawing down on top of the lute, and see how things match up.

The drawing is done with 4H pencil on drafting mylar, and shows the positions of the neck edges, the first course, the bridge, the rose, and the body outline.
If I've done my work carefully so far, things should line up pretty well. The neck angle is good, the location of the rose is very close, the belly outline is fine... I should be able to just go ahead and mark. (If on the other hand some crucial piece of alignment is off--for instance, the neck angle's not quite where I want it to be--then I need to move the drawing around a bit, to compensate, making sure that the crucial relations of the neck edge and chanterelle are maintained.)

The rose centre and the bottom of the belly are two reference points I use to locate the layout drawing.

Using the working drawing to mark the position of the bridge allows me to get the correct angle of the bridge, which is tilted slightly upward on the bass side. 


Here's how I mark: a pin prick right through the mylar, at exactly the point where the chanterelle meets the glued front edge of the bridge.
I make another careful pin mark on the bass side of the 13th course, at the bridge's glued front edge.

I tattoo the pin pricks lightly, with a sharp, soft pencil.

And there it is--one of my two bridge location marks.

Now all I need is a bridge to glue there--and making that will be the subject of my next post.


Sunday 17 November 2019

Building a 13 Course Lute, Start to Finish, 8: Trimming the Braces, Fitting the Belly

Hello, good morning, welcome back to the shop. This time out, I'll be trimming the braces I've just glued onto the belly, adding a few more small braces, and preparing to fit the belly into the body--one of the turning points of lute making, since we're nearing the point when the sound box is closed, and the lute finally starts to look like a lute.

You might recall that I ended last week's post with an ode to randomness in placing and gluing the braces on the belly. I would like to assure you that that idea did not originate with me. Like all (or nearly all) my good ideas about lute making, it came from Grant Tomlinson, and he has told me that the observation originally came from Stephen Gottlieb, whom Grant studied with in London for a year in 1986. I worked with Grant for a year in 2009, and I remember him recalling to me, fondly, Gottlieb's advice to him: that one should put the braces on "higgledy-piggledy."

Words of the masters, passed down through the ages....

Here's my higgledy-piggledy result.

The very first thing I do is trim the edge of the belly on the band saw, taking it to about 5mm of my marked body outline. (It looks much more orderly already.)

All of the braces are glued on taller than their final height, since the go-bars bite into the tops a little bit. Now I use my low-angle block plane to trim them carefully to height. (Note that I'm supporting the ends of the curved braces with the same cauls that I used for gluing them.)

 I then chamfer the top edges of the braces. For this job I use a little Veritas miniature bull-nose plane, with a scrap of wood clipped to one side as a fence. (It works very well for keeping the plane at a 45 degree angle.)
There's my high-tech setup.

In preparation for scalloping the ends of the braces, I mark a height of 5mm with a wooden spacer.

 I then scallop the ends of the all the braces with a skew chisel.

I look for a graceful and fairly uniform shape on the ends of all the transverse braces.
When I have a good shape on all the braces, I need to shape and glue down a few specialty pieces. I put spruce tabs in a few spots around the outline of the lute, where there are no bar ends to support the edge rib. The number and position of tabs varies with different lutes and barring patterns, but on this one I'll stick down a couple between the first and second transverse bars, and a couple on the bottom of the belly, below the j-brace.

Here's what the tab looks like--just a short length of bar material with a slipper-shape carved into one end.

And here it is, stuck down (with hide glue, of course.)
I also shape and glue a small "chanterelle bar" directly under the position of the first course. This bar helps to support the sound of the top course on the two highest frets. 
Now I need to take you on a small, rather boring detour (just to remind you, again, that lute making is not all glory!) My next step is to glue some small support bars across the rose, and normally I'd just go ahead and do that by reaching for my stock of ready-made rose bars, but... sadly, my stock is depleted. Oh well--nothing to do but take a couple of hours and make a hundred or so, so I don't have to do it again for a while.

I thickness some sheets of spruce brace material to 2.5mm, then shoot one edge clean.

I use my shop-made purfling cutter to cut off a strip about 3mm wide.

There's one--now I'll shoot the edge anew, and cut off another strip, and so on, until I have a whole bunch.

I stack them side by side in my planing box, rough side up, and....

Plane them flat, and a uniform 2.5mm thick.

I then chamfer the top edges with a ledge jig and my low angle block plane. 
That's it for the detour--now I can get back to the task at hand, which is gluing the rose bars on the rose.

Having cut the bars to length and blackened the bottoms, I carve a little scallop in the tip of the bar. Why the scallop? Because that makes it easier...
To scorch the tip!  I brush glue on the bar, stick it down in place, and then bring in my wood burning knife. Scorching the tip has the immediate effect of crystallizing the hide glue, sticking the tip of the bar fast to the belly. When I've scorched both ends, I don't need to use any other clamp to hold this bar down--it's secure. I can move on to gluing the next.

There they are, reasonably neat and orderly--and an illustration of yet another of the many miraculous properties of hide glue.


I'll let the glue dry thoroughly before working any further with the belly. In the meantime, I have to do a few things to prepare the body for fitting up the belly.


I remove the screw I used to attach the neck (a #8 deck screw)...
Drill out the hole, and swap it for something a little beefier (a #14).

I carve away the rough edges of the counter cap (which I glued in long ago.)

I don't want any edges inside the body to be too abrupt or too sharp. I have the notion (maybe it's a superstition) that they might impede the efficient production of sound.

Now I need to go back to the neck, and do a little more planing.

I want to make sure the surface is quite flat in long section (it's been a few weeks since I worked with the neck and it may have changed shape slightly since then.)
But that's not all I'm doing here. To tell you the complete story, I'm actually planing a twist in the upper surface of this neck. Specifically, I'm planing a slight downward slope across the neck, so that, at the nut end of the neck, the treble side will be somewhat lower (maybe about 1mm or so) than the bass side. (Even though it is twisted, however, the surface of the neck will continue to be flat in long section.)

This has the overall effect of lowering the action--that is, the eventual height of the strings above the fingerboard--of the treble strings in relation to the bass.

This operation is all carefully controlled and accounted for in the planning and building of the instrument, throughout even the earliest stages of construction. For instance, I know from the outset that I'll be planing this twist in the neck, and therefore I know that I will be reducing the neck's thickness by a certain amount (a bit less than a millimetre.) I have to account for that when I'm laying out and shaping the neck. Similarly, I know that if I plane away some material on the treble side of the neck, the neck will end up a little bit narrower--and so I have to plan for that too.

Just a few of the complications that make building a 13 course lute such special and challenging project!

All right--the body is pretty much ready to accept the belly. So now, I can get back to the belly, and begin fitting it up.

I use templates to mark the cut-off angles for the various bar ends (I've taken these angles from the mold.)

I use a razor saw (with a lot of wax on the blade) to make the cut. I make sure not to cut too far inside the line (the body outline, marked on the belly)--I want to leave myself some extra length, so that I can later trim the bar end to the exact length.

A small chisel removes most of the excess material, but I don't go all the way to the belly surface (because I don't want to mar it.)

Instead, I leave a bit of bar material right next to the belly.

To remove it, I use my wood burning knife and a strip of cotton soaked in water. I apply a little steam...

And the glue releases. I can remove the bit of bar with a sharpened stick, and the belly is left unblemished.

Last step for now is to trim the belly edge to within a couple of millimetres of my outline. I'm pretty much ready to start the fine fitting process, which will be the subject of my next post.


Sunday 10 November 2019

Building a 13 Course Lute, Start to Finish, 7: Bracing the Belly

Hello again. Today, another adventure in lute making: shaping and gluing the braces on the backside of the belly. Perhaps not the most glamorous job in the lute maker's resume, but essential to the sound and structure, and eventually the action, of the finished lute.

At the beginning of this blog series, somebody on social media asked me a question something like this: is building a 13 course lute all that different from building a renaissance lute? My answer could only be superficial, but I said yes--and that's mainly down to the fact that whereas a renaissance lute has a relatively flat (though not completely flat) fingerboard, a 13 course lute has one with a very pronounced arch. Practically every operation bends--often, quite literally--toward accommodating that feature. Today, we'll really start to see that principle in action.

[Small editorial comment here: throughout this post I will refer to 'braces' and 'bracing,' rather than 'bars' and 'barring.' I think the former is more a British usage, the latter more commonly a North American one. Writing in Canada, and in Canadian as I do, I'm generally more likely to go with British spellings, though in this case the Britishism seems a bit foreign to me. However, I've decided to use it to alleviate confusion when I start talking about go-bars and the go-bar deck.]

In my last post, I carved the rose. Upon finishing that job, I hung up the belly one more time in the light box for 24 hours, in a low-humidity environment, for another round of humidity cycling (described in more detail here, in the 5th instalment of this series.) After bracing the belly I won't be doing any more humidity cycling, since the braces are glued across the grain (and to put the assembly in a low-humidity environment at this point would be disastrous.)

So no more humidity cycling with the belly, but I will nevertheless continue to carefully control the relative humidity in my workshop, in two ways: by using a small oil-filled heater to warm my work room, and, when the relative humidity is a little too high for that to handle, by turning on my dehumidifier. These two little appliances can make working conditions uncomfortably warm at times, but together they enable me to keep the r.h. in my shop in the low-40% range, which is optimal for crucial jobs like gluing on braces, and, a little further along, gluing the bridge.

Here's my brace material: alpine spruce, from the same source as my soundboards. It's sold in split billets, which guarantees that the pieces I cut will be practically free of runout. (Watch out for that knot!)

After cutting braces to generous length and height, I take them to a quite exact and uniform thickness with a bench plane.
I have a planing box for the purpose--just a small plank with some edging--which fits into my bench vice.


All three sets of braces are 'roughed in' for all three lutes. The brace dimensions and locations are based on historical examples, and on my own years of experience building a lot of lutes with the same or very similar material throughout. (One does get to know one's material quite intimately after a while.)

I bend thicknessed sheets of material for j-braces using the bending iron and a bit of water from the spritzer. Later, when they are cooled and dry, I will cut individual j-braces from them in the bandsaw.
Once the braces are prepared, I'm ready to go ahead with gluing them on the belly--and I will complete all the work to follow in today's post in about 3 hours. It's essential for me to do all this work at one go, to ensure the freshest gluing surfaces and the most consistent shop humidity. These precautions--these principles--will do much to ensure the finished instrument is as durable and as sound as it can possibly be.

I scrape the belly. Not to remove much material, only to refresh the surface of the wood by removing the slightly grimy, gluey and oxidized outer layer. 


I mark the centreline, and the positions of all my braces.


I locate the body of the lute very carefully on the backside of the belly, and trace the outline. I use wedges to lift up the middle of the belly (remember the belly scoop from episode 2?


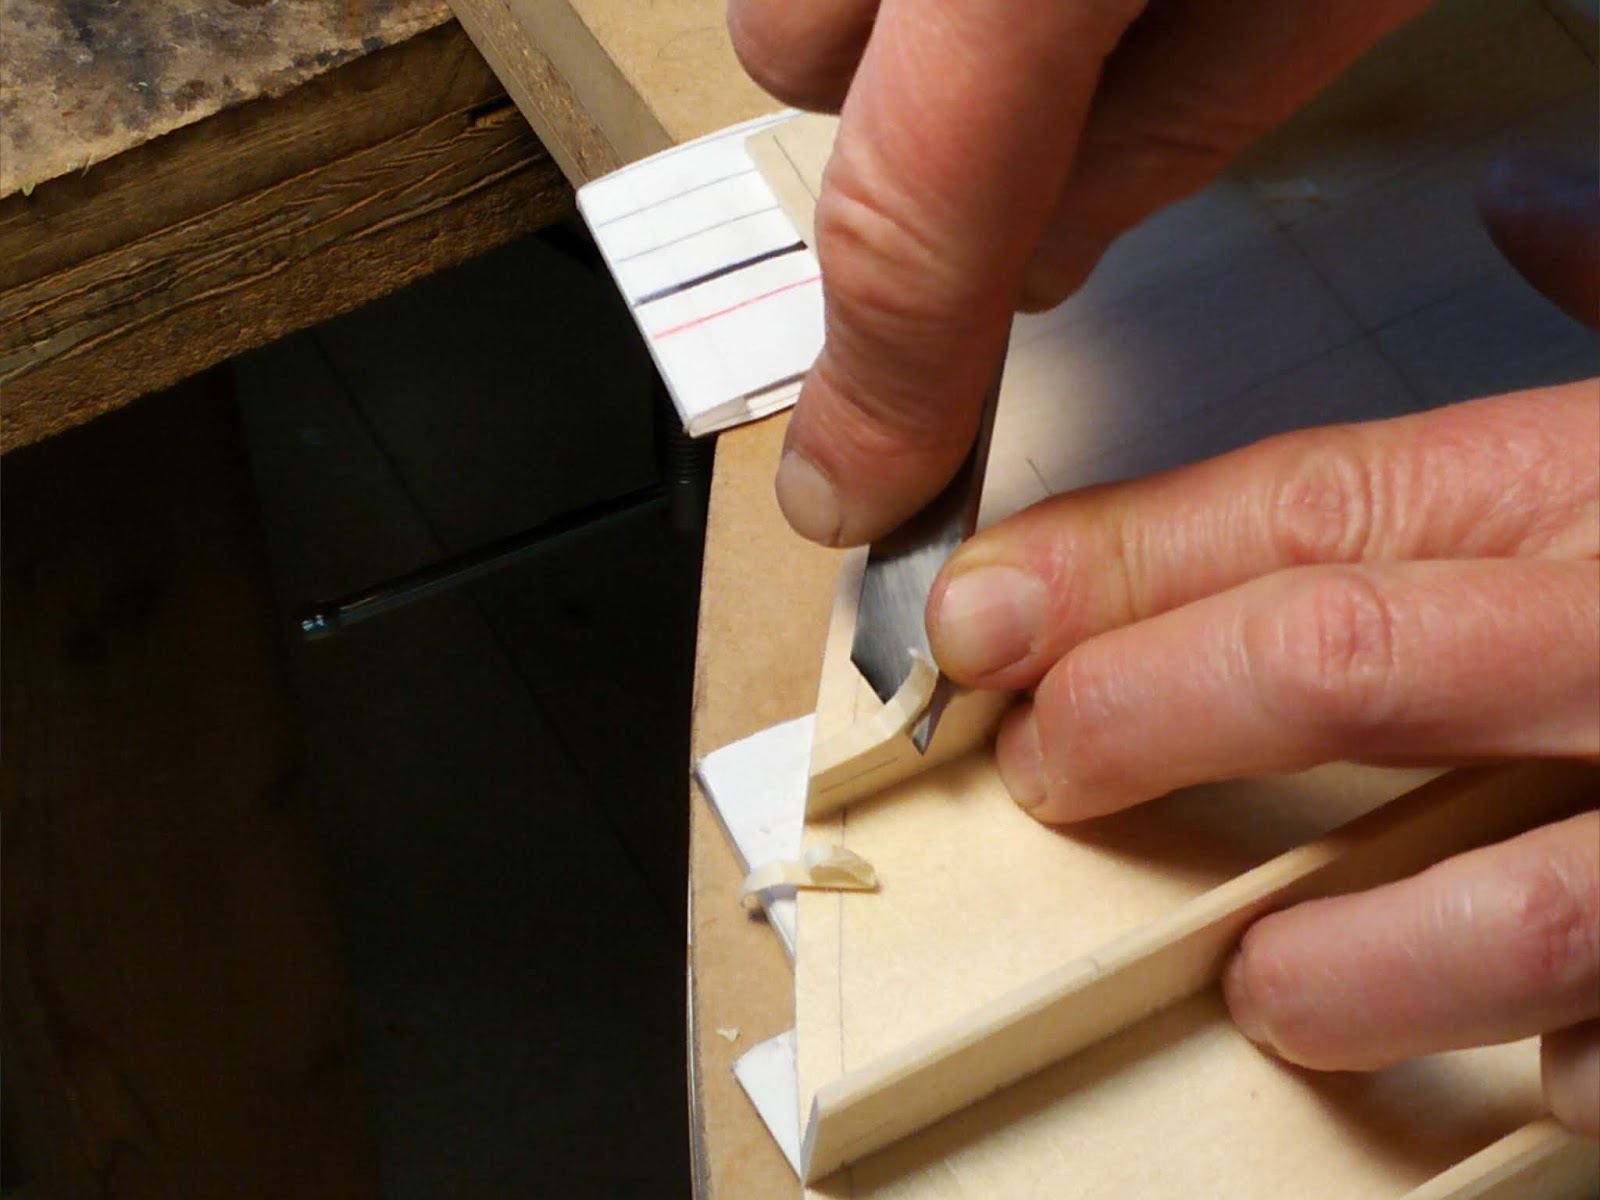
I then shoot the bottom of each brace, to give a fresh, perpendicular gluing surface--and, on quite a few of them, to create a carefully controlled amount of curvature on the underside of the brace.


Take, for instance, brace #7--the highest on the belly, the one closest to the body-neck joint and therefore to the fingerboard. The fingerboard, at the body-neck joint, will be significantly arched--somewhere around 3-3.5mm across approximately 100mm of width. That fingerboard arch cannot simply stop at a dead-end where it joins up with the belly; there must be some sort of transition between the fingerboard curve and the (relatively) flat surface of the belly. To achieve this, I plane curves into the top three braces, gradually easing the amount as the braces approach the rose.

This is the way I will support the belly to glue on this curved brace: with carefully-shaped curved cauls. The cauls are made of strips of cardstock, cut to length, stacked, and taped together.

As you see here, it's not only the top three braces that are curved--there is also a small amount of curve in the first two braces in front of the bridge. (I'll explain the reason for the curves in those braces when the time comes, in a future post.) I also place a thickness of cardstock under the rose, to support it, and a few small wedges of card to support the uncurved braces below the bridge.

What can I say? The three-dimesional geometry of a 13 course lute belly is very complex indeed. Stick with me; all will become clear. 

I locate the belly very precisely on top of these curved cauls, on the bottom floor of the go-bar deck. Almost ready to begin gluing... but first, back to the braces for a minute or two.

A little more shaping to do: I use my trusty low-angle block plane (with a very sharp, and slightly curved, blade) to slightly taper the braces, so they are narrower at the top. A few strokes with the plane on each side of the brace is enough, and I am careful not to reduce the already-established nominal thickness of the brace at the bottom.

This is the kind of profile I'm looking for.

Here's how I shoot the bottom of the j-brace: by running it over the upturned bench plane in the vice.

Almost ready to glue, but first I ink black the bottom surface of the three bars that cross the rose (note the authentic 16th century Sharpie.) There are three bars across the rose, and I black only the portion of the bottom surface that crosses it. 
Here's the best shot I have of the whole go-bar deck and glue pot rig. I'm reaching up on the top of the deck, where the oak go-bars are kept (and, may I say, also rocking quite a saucy pose.) I'll be reaching overhead for go-bars throughout the gluing process.
Here's how I glue. Starting at the bottom of the belly, I take a bar, hold it above the rim of the glue jar and brush glue upward onto the bottom surface. I keep dipping the brush in the jar, then brushing hot glue upward, ever higher, until I've got good, even coverage with glue that is a pretty uniform temperature.
And then, I get the bar down quickly in place on the belly, giving it a slight rub as I do so, to ensure good initial contact. Holding the brace in spot with the palm of the left hand, I reach up with the right to grab a go-bar. Still holding the brace securely with the lefthand palm, I use the left fingertips to locate the tip of the go-bar on the top of the brace, while the right hand swings the upper end of the go-bar into place directly above, against the ceiling of the go-bar deck.

Huh?

Yeah. I just read that over again, and it might seem a bit confusing. But really, that's how it goes, and short of actually doing a video of me working (which I'm not interested in doing), I can't make it much clearer. You'll have to just take my word for it--or, better yet, try it yourself.

Still holding the brace with the left, I place two, three, four, or even five more go-bars, as needed, in order to secure the brace. Then onto the next.

Here's the first brace. Seems like a good start.

Oh yes, and after I glue each brace, I clear away excess glue with a long-handled brush whose ferrule I've bent for the purpose.
About half-done. It's getting to be quite a forest of go-bars, and I must be careful as I glue each successive brace not to nudge the go-bars of previous braces. (A domino-style disaster is thus averted.)

Full shot of the go-bar deck. This one was made by and belongs to Grant Tomlinson, whose shop is right next door to mine, and who kindly lends me it whenever I need. (I have my own set of go-bars which I use with the deck, however.) 

We see the top bar here, the one with the most curve, with the belly beneath supported by the curved cauls.

One more shot of the go-bar deck? Why not. It's a simple piece of machinery, but it works perfectly. I love that kind of technology.

And next morning, after carefully taking down each go-bar, and removing the belly from the deck, I see my result. All the braces are securely glued, and they look reasonably orderly.

However, most of these braces, I will confess, are not placed with an excess of precision. I get them in basically the right spot, but, as you can see, there is some randomness to the angles of most of them (the top two, especially, seem a little askew--or is it the third one?) But that's actually what I'm looking for, a little randomness. One sees it all the time looking at old lute bellies. As with their rose carving, one gets the sense that the old makers actually distrusted too much symmetry, proportion and control, and actively as a principle courted a certain amount of chance and randomness in their work. Perfection is a kind of death, both visually and sonically; imperfection is energy and life.

 Next time: shaping the braces, and fitting up to the body. Have a wonderful week.