It's another in a fairly long list of instruments that I have been asked to build that, at the outset, I didn't know too much about: I was more or less a stranger to the repertoire, and had never encountered this specific type of lute either in performance, or in the catalogues of other makers whose work I knew well.
But I figured that ignorance has never stopped me building a lute before, so why should it now? Every instrument I make is, in one way or another, an opportunity for learning; the difference here is only one of degree. So with the help of a number of people, I set about learning the essentials of the instrument, and then slowly, and carefully, put together a concept, and then a plan, and bit by bit began to build the lute.
 |
| Antoine Watteau, Les Charmes de la Vie, ca. 1718 (detail), courtesy http://watteau-abecedario.org/default.htm |
A 'Lesser French Theorbo for Lessons,' as James Talbot called it in his late-17th century treatise; or in the words of the French commentators of the era, 'théorbe pour les pièces' or 'théorbe de pièces.' A small theorbo for playing solo repertoire, distinct from the larger continuo theorbo or 'théorbe d'accompagnement' that had been imported to France from Italy earlier in the 17th century. Both large and small théorbes had 14 single strings, with the two top strings down an octave, but while the larger instrument was tuned in A, the smaller was tuned a fourth higher, in D. The string length was (obviously) much shorter for the D instrument, and the body was also much smaller than that of the full-sized théorbe.
What was its repertoire? As Robert Spencer noted in his seminal article 'Chitarrone, Theorbo and Archlute' (Early Music Vol. 4 No. 4, October 1976, available online at David Van Edwards' website), the surviving solo repertoire consists of a half-dozen manuscripts, as well as a few prints, with original music by, or adapted from, musicians connected with the court of Louis XIV, chief among them Robert de Visée, 'guitar player to the king.' Perhaps the most important of these sources is the so-called Saizenay manuscript, containing pieces for lute and théorbe by de Visée and others, collected by de Visée's student Jean-Etienne Vaudry de Saizenay, a provincial nobleman. It was this musical source in particular that my client, Bruce, told me he was most eager to explore with this new lute.
Selecting a model
With my basic education on théorbe taken care of, Bruce and I began to talk about a suitable model on which to base an instrument. There are a number of short-string-length theorbo-type instruments in museums around the world, but two in particular seem most to resemble the kind of iconographical examples of the 'théorbe de pièces' that we see in pictures such as the one above. One is in the Yale University Collection of Musical Instruments, and the other is in Paris, at the Cité de la Musique. Have a look at them side-by-side:
 |
| Photo courtesy Yale University |
 |
| Photo courtesy Cité de la Musique |
 |
| Photo courtesy Yale University |
 |
| Photo courtesy Cité de la Musique |
[A brief aside: the keen-eyed among you may have noticed that both of these instruments have 16 single strings, which technically makes them angeliques, rather than théorbes. (For a discussion of the angelique and its repertoire, see Mathias Rösel's articles in the Lute Society of America Quarterly, Vol 52, No.4, Winter 2017.) As a matter of fact, as far as I know, there are no extant examples of a 'théorbe de pièces' in any museum. Indeed, some modern commentators have taken this lack of a surviving exemplar as partial evidence for a contention that the instrument never existed at all, that it was a figment of 17th century theorists' imaginations, and that the solo repertoire is best played on the larger 'théorbe d'accompagnement' anyway. To me, as a lute maker, the argument is academically interesting, but a bit beside the point; I've been asked to design and build an instrument that fulfills a very strong musical impetus in my client, and (in this case at least) that is my utmost, indeed my only, concern.]
Don't be fooled by the apparent relative sizes of the lutes in these photos. The Yale instrument is the larger of the two, having both a wider and longer body than the Paris, and a longer string length both to the first nut and to the extension. The current string lengths of the lutes are: Yale, 74.0 cm to the main nut, 126.8 to the extension; Paris, 68.3 to the main nut, 114.1 to the extension.
The Yale instrument seems to be the one that most modern makers have based their versions on, and I wonder why that is. Perhaps it is because the belly and back are, apparently, from a genuine old 16th century Italian lute. The printed label inside reads 'IN PADOVA Vendelio Venere', with the date '1592' handwritten above it. Such old Italian lutes were much prized in France in the 17th century: Piccinini (1623) tells of French 'luthistes' scouring the Italian countryside to find old lutes, which they bought sometimes for enormous sums, and then brought back home to have converted to lutes in the most up-to-date style. The new neck and double pegbox extension on the Yale lute would have been added in France, probably in the middle-to-late 17th century; the belly, at least, shows clear signs of the conversion. (I know this last fact from reading Ray Nurse's notes on the lute, which he made during a research visit in the late 1970s. Thanks again, Ray.)
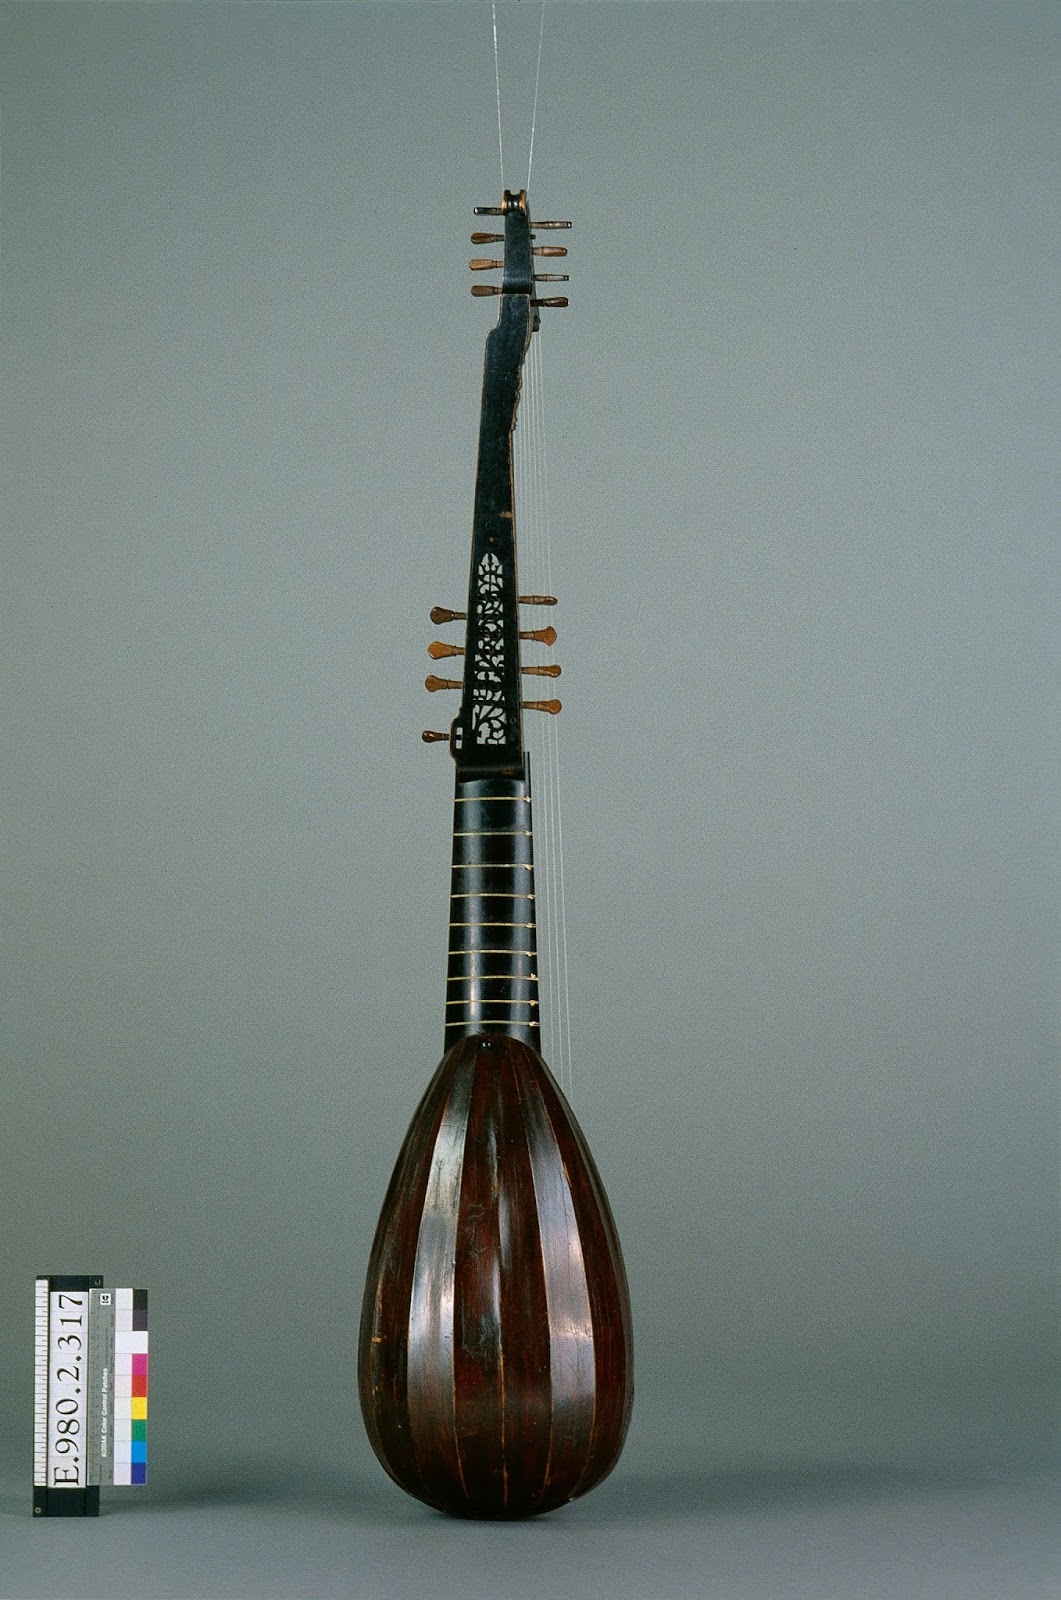
The body of the Paris instrument, by contrast, though it resembles old Italian lutes, is pretty clearly not an 'old' lute (that is, not a 16th century Italian lute.) The label inside, which reads 'Jean d'Arion/ In Bollonia 1574' is called 'apocryphal' by the Cité de la Musique. I don't know why, though I can take a couple of guesses: perhaps there is no historical evidence for a maker by that name having worked in Bologna in that year, or at all; perhaps the odd spelling of 'Bollonia' is another tip-off. In any case, there are no apparent signs on the lute of any conversion such as re-necking having taken place, which suggests to me that the lute was built from scratch as a small théorbe/ angelique, with a body made in imitation of early 16th century Italian lutes, in France in the latter part of the 17th century.
Though there are many points of similarity between the Yale and Paris instruments, the photos show how different their body shapes are. The Yale's Venere body from late-16th century Padua has a full, rounded shape, especially in the shoulders and behind the rose; the Paris, by contrast, is much narrower in the shoulders and more elongated, clearly reminiscent of lutes by early-to-mid-16th century Bolognese makers such as Laux Maler and Hans Frei. The maker's 'apocryphal' label was an effort, I suppose, to make that connection explicit, and thus to 'steal a little shine' and presumably make the lute more enticing to a prospective buyer.
However, I think this lute shouldn't be seen as any kind of 'forgery' in the modern, post-Franciolini sense of the word. If any deception was intended, it was mild (perhaps along the lines of the 'Stradivarius' label that's inside my grandad's old fiddle.) I think it's fairer to see it as a sincere homage or imitation of the earlier makers' work--and in that sense, it's not too far removed from what we modern makers do when we design and build our 'early' instruments.
So for me, far from disqualifying this lute as a model for our new 'théorbe de pièces,' these circumstances make it even more enticing. I think of the Paris lute as an expression of what, at the time, would have been an ideal example of this type of instrument. (The pegbox and extension are, as we shall see, especially beautiful.) For this reason, and for a couple of other practical reasons that I will talk about below, Bruce and I both agreed that the Paris lute would be our model.
Making a plan
Normally, the next step in making a lute would be to obtain a copy of the museum's technical drawing, but unfortunately, no drawing of this instrument exists. However, the Cité de la Musique was able to offer a set of high-resolution digital photos, which they kindly sent to me through the ether. (I think they were the same resolution as the photos available for download from the museum's website, but still, it's the thought that counts.)
My next step was to bring the downloaded files to my favourite print shop and have them enlarged to poster-size, to approximately the dimensions of the actual instrument. Once printed, I took these long paper rolls back to my workshop, and made tracings of the outline of the body and the extension. I then took these line drawings back to the print shop, and had them reduced or enlarged slightly to try to get them close to the actual dimensions of the lute.
This was not as easy as I had hoped. I learned very quickly that a photograph, especially one of the full-size instrument, distorts the subject to the point where the results are almost unusable. If the folks at the print shop enlarged the photo so that the length of the extension was correct, then the dimensions of the belly were far too small; if the belly was printed to the correct dimensions, then the extension was far too long. Separating the tracing into two parts, body and extension, helped a little, but even making an enlargement of the belly so that the length and width matched up proved very difficult to do.
(By the way, in this process I relied on measurements of the Paris instrument provided to me by Grant Tomlinson. This lute was one of the many that Grant was able to examine during his lute research trips to European museums in the late 1970s and 80s. Although he didn't make any tracings or take any sections of the body, he did take essential measurements of things like length and width of the body, string lengths to the lower nut and the extension, etc., and these were a lot of help. For instance, his notes confirmed for me an anomaly I discovered in working with my tracings: that the museum's data for this lute misstated the string length to the extension--by 30 cm. That length is, in fact, 114.1 cm, not 144.1, as stated in the museum's literature--quite a discrepancy! Thanks, Grant.)
So what did I end up with after this exercise? The bare essentials, I would say. Some useful though not-very-clear views of the extension; some views of what the body kind of looks like in long section, cross section, and outline, but nothing near precise enough to allow me to make a close copy.
But that was all right--I already knew that even if I could make a copy of the body, I wouldn't want to. Why not? Well, making a drawing and a new mold is a pretty substantial amount of work, and at the end of it I would have a mold that I could use for one instrument only, a 'théorbe de pièces' based on the Paris angelique. While not a complete waste of time, it wouldn't be the most efficient use of my time, either. Usually, if I am going to go through the trouble of making a mold, I do it with the hope that I can use that mold for other projects in the future, projects that may not have much direct connection with a small théorbe. I'd like my molds to be as versatile as possible. Allow me to explain.
When I looked at the photos of the body of the Paris instrument, I saw something that looked very close to surviving examples of the work of Laux Maler. In fact, the delicate remains of an authentic Maler lute reside in the very same museum in Paris, so it is easy for us to make a direct comparison. Again, side by side, Maler on the left, angelique on the right (all photos courtesy the Cité de la Musique) :
 |  |


 |  |
Alas, it was not to be. The most promising Maler candidate, the Paris instrument, has no drawing available. The other two Maler lutes whose shapes I experimented with, hoping for a match (one in Prague, and one in Nürnberg) turned out to be just a bit too small for my purposes. I could have taken my drawing of a slightly-too-small Maler lute to my print shop, and had them size it up to fit, but at a certain point I realized that making a new mold just wasn't practical. There was already a suitable model for me to use, more or less staring me right in the face: the Warwick Frei. Here are some photos of my 11c version, made in 2013:


The Warwick Frei made the most sense, for a number of reasons. First, the body shape was a good match with that of the original Paris angelique, although it actually has a bit more fullness through the shoulders and depth in the cross section than the original--and I figured that extra resonant capacity would benefit a théorbe. The size of the Warwick Frei worked well too: my client, Bruce, had asked for a stopped string length of 72 cm, which gave a neck long enough for 9 tied frets, and space for a 10th, not tied--which fits very well with the descriptions of contemporary commentators such as Talbot.
Just as importantly, as we've already seen, it was the work of both Frei and Maler that the luthistes treasured, so using a Frei body in this case is completely justified, from an historical point of view (my guess is that if the maker of the Paris angelique had had available to him a Frei lute like this to use for his instrument, he would have given his right arm for it.)
In addition, from a purely musical point of view, I've used the Warwick Frei body for a lot of different types of instruments--a 6 course, numerous 11 courses, a 13 course with Jauch-style triple extension--and all have turned out exceptionally well. The Warwick Frei seems to be one of those models of lute that just works, no matter what I ask it to do.
I had one more good reason to use the Warwick Frei: the mold was already made, and hanging in the rafters of Grant Tomlinson's workshop next door to mine. When I asked him if I could borrow it to use for the théorbe, Grant generously said yes. Thanks again, Grant!
Building the instrument
 |
| Courtesy Cité de la Musique |
Actually, a remarkable amount of work can be done on a lute--I'd estimate 80 to 90% of it--without knowing what the final pegbox or extension is going to look like. Build the back; shape and veneer the neck; attach the neck to the body; select and thickness a belly; carve the rose; design the harmonic barring pattern under the belly, and glue and shape the bars; design, carve and glue the bridge; fit the belly to the body and glue it in; add the fingerboard, points and ebony belly edge binding; finish out the lute to its final shape, action and look; and then apply varnish. Lots of work to keep a fellow busy. A couple of highlights:
The rose design. The pattern, drawn by Ray Nurse, is taken from a late-17th century engraving by Gérard Edelinck of the painting of Charles Mouton by François de Troy. Here's a copy of the engraving, in the British Museum:
 |
| Courtesy britishmuseum.org |


By late spring, the lute had been finished out and sent to the varnish booth. It was now starting to be time for me to figure out what, exactly, I was going to do with the extension.
As I said above, I had some rather fuzzy photos. Here's what I was looking at:
 I had front, back and side views of the upper pegbox, which would be, if I was pressed, enough for me to do a final draft of a design, and then make the thing. There were some details that I wasn't too sure about--like the shape of the nut, or the contours of the slipper-shaped foot of the pegbox--but I was confident enough that I could make a reasonable facsimile of the original that would both look good and work well.


Nelson! I cried out on the Facebook messenger, If you happen to go back to that museum--please--take some pictures of the angelique for me!
And amazingly enough, that's exactly what Nelson and Korin did. They went back to the museum, and took a ton of really excellent pictures of the angelique, and sent them to me. Of course, they had to take their pictures through the glass display case, and they were only able to take shots from the front of the instrument--but still, it was enough to clear up all of the questions I had, not only about details of the upper peg box, but that lower back panel as well. Thanks a lot, Nelson and Korin!
Turns out Facebook isn't a complete waste of time after all!
I'll show you two of their pictures that were among the most helpful. This one gives a nice, clear view of the upper peg box's slipper foot:


The upper peg box is located on the extension by means of a small dowel.


And that is all I have to say, for now, about the Lesser French Theorbo, or théorbe de pièces. Perhaps it is enough. (Of the sound, I can say little: I'll leave it to Bruce to make a comment, if he likes.) This feels like the longest blog post I've ever written--and it may be the most lavishly illustrated, as well. (If you would like to see more pictures of this lute, please visit my flickr page, here.) My thanks to all the people who made this work of mine possible--there are many, only a few of whom I've named and tried to thank in this post. I'll thank you as well, dear reader, for having the patience to stick this one out with me. As Louis XIV used to say to his friend de Visée, after a long day in the salt mines: à bientôt!
 |
| AntoineWatteau, Les Charmes de la Vie (ca. 1718, in the Wallace Collection)(Courtesy Wikimedia Commons) |


