Hello friends, and welcome back to the 13 course chronicle. In today's installment, I want to describe a couple of operations: measuring out and cutting the rebate for the peg box, and fitting the peg box into it; and making the chanterelle tuner, and fitting, gluing, and carving it in place. I had imagined that I would also talk about fitting and gluing the bass rider, and then gluing the peg box onto the lute, but I think that's a little much to bite off for one blog post. I'll save those tasty bits for next time.
Just to catch you up, I've made the basic peg box and veneered it with ebony, front and back. I have also, by now, completed the varnishing of the lute back. It took four coats of varnish, and it looks great. (You'll get a glimpse or two of it in this post, but I'll show you some nice pics of it a little later on.) So now it's time to put lute and peg box together, and start bringing this instrument down the home stretch.
The first order of business is to confirm the string length of the lute, and mark the neck cut-off.
From the very beginning of work on this lute--as far back as my original working drawing--I have allowed for an extra 5mm of length on the neck. This was meant as a bit of insurance against mishap, and against neck length lost in fitting and re-fitting to the body. Now I can remove all the excess length that remains.
 |
| I mark out the string length, and the width of the nut, with a long ruler. |
 |
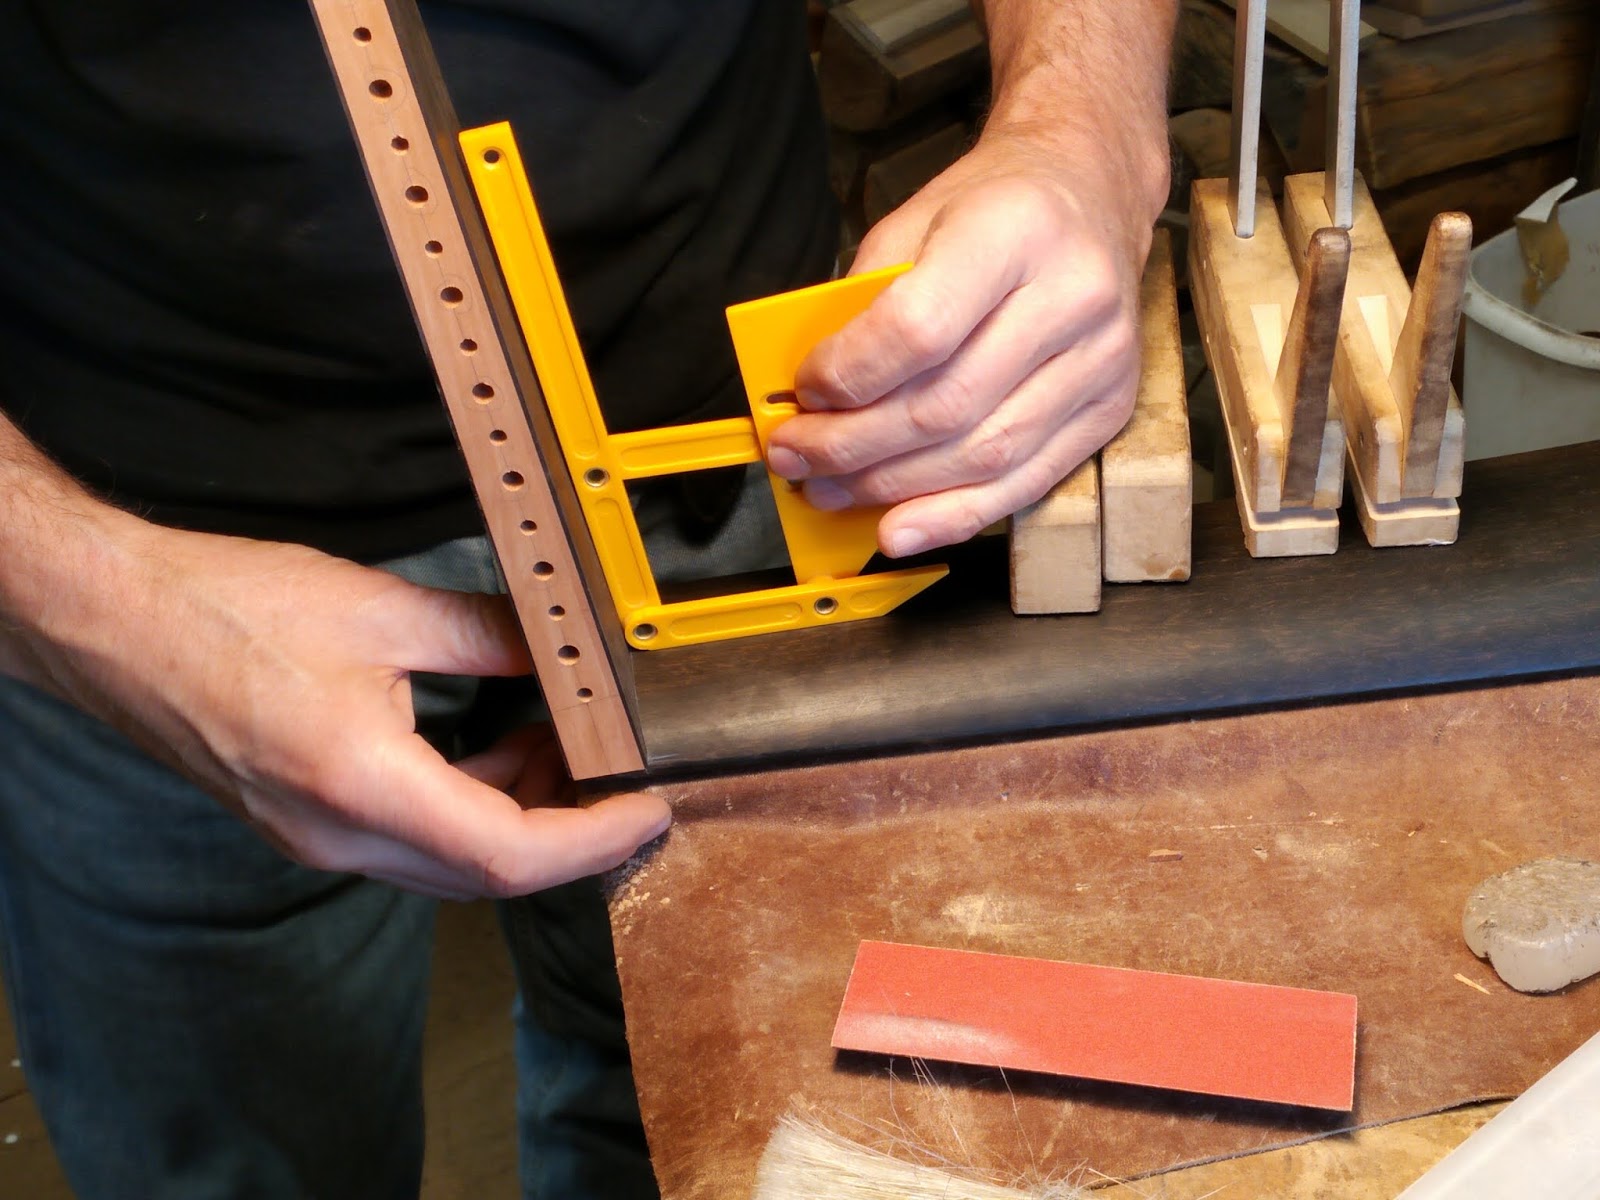
| I also measure and mark an accurate centreline on the neck, and from this draw perpendicular lines at those points. Because the neck surface is distinctly curved, it's difficult to use a flat square to mark them out. Instead, I use this piece of mylar with a centreline and squared end. |
 |
| Now I can make the cutoff, which I do free-hand. My weapon of choice for this operation is a 'gent's saw' from Veritas, with a lot of wax rubbed on the blade. |
 |
| One useful consequence of having to make this cutoff is that I get an accurate record of the thickness and curves of the neck and fingerboard of this lute. I'll file this one away in a box with all the others, and use it for future reference. (All necks and fingerboards work out a little differently in practice, no matter what you plan. I think this particular neck/ fingerboard is going to be quite comfortable, and I will refer to it for future instruments.) |
I trim up the end of the neck with a low-angle block plane (taking very fine cuts, and stroking inward from each side), and files. Then I can start laying out the peg box rebate.
 |
| All the measurements for the rebate are taken from my working drawing. I first mark the neck thickness that I want, shown by the line drawn across the neck. I extend this line up the sides of the neck with the marking gauge. |
 |
| I then 'tilt' those lines up the side slightly by eye, and mark them with a straight edge. For the back line, I mark the width of the rebate at three points--the centre of the neck, and at each side of the rebate. I then connect the three points by drawing a line with a flexible curve. |
By the way, I don't treat these lines as gospel, but as guides. No matter how beautiful my working drawing is, the actual lute neck and peg box will vary slightly from it. I leave a fair amount of room for adjustment, then when fitting work toward the lines using the peg box itself as my ultimate guide.
 |
| With layout complete, I can clamp the lute neck securely to the bench edge. I use a spacer to raise the neck slightly off the bench, so that the belly doesn't rest on the bench (the green pad beneath it is there as a precaution.) There's a piece of leather between the fingerboard and the spacer piece, which prevents slippage, and protects the neck against marring during the fitting-up process. |
 |
| I use the gent's saw again, and make the cut at the back of the rebate first. |
 |
| I then make a series of cuts to facilitate the removal of material in the rebate. |
 |
| A 1" chisel, held close to the tip for good control, works well for removing the excess. |
 |
| The same chisel works well for flattening the bottom of the rebate. |
 |
| The peg box itself is the ultimate reference in fitting this joint, so I need to prepare it carefully. I first must flatten the back surface so that it's completely flat--especially in the bottom 10 mm or so, which will fit into the rebate. |
 |
| I must also flatten the bottom of the peg box, having first made the angled cut-off with the band saw. (The angle is taken from the working drawing.) I use files and sanding blocks to get the surface I want, and I check the flatness with an engineer's square. |
[Edit August 6:]
I feel I must pause here, and open up a small can of worms. If you have been following this blog series closely, you will recall that in an earlier episode--
episode 8, to be specific-- I described the process of planing a small slope or 'twist' in the upper neck surface. This operation was one of the jobs I did immediately before fitting the belly into the body, and the effect was to lower the action of the treble side of the string band in relation to the bass side. As I mentioned then, this technique is one of the keys to making an instrument with a very low and comfortable action; it's also something that I needed to take account of and plan carefully for, all the way back to the beginning of designing and making a working drawing of the instrument.
Well, here is another place in the building process where I need to take account of this 'twist.' Since the treble side of the neck, at the nut end, is now about 1mm lower than the bass side in relation to the body, if I fit up my peg box perpendicular to the neck (viewed from the nut end of the lute), it's not going line up with the middle rib of the lute. Instead, it will lean a little askew, to the bass side. Maybe that doesn't seem like a big deal, but with a long peg box like this one, the effect could be a little jarring. I compensate for it by tilting the cut-off of the bottom of the peg box slightly, making the bass side of the box about 1mm longer than the treble side. That straightens the peg box up in relation to the body. It's not hard to do, and it doesn't make fitting the peg box in the rebate any more difficult, so I just do it--not only for 13 course lutes, but for every lute I make (because I use the fingerboard 'twist,' to a greater or lesser degree, on every model of lute in my repertoire.)
Is that clear?
[End of edit.]
 |
| During the process, the back corner edge of the peg box becomes very sharp. Since I know that my rebate can never be made that sharply, I want to relieve this edge slightly, which I do with a stroke or two of a very fine file. |
 |
| With the peg box accurately shaped, with very flat surfaces on the back and bottom, I can get to work finalizing the rebate. These are the main tools of the trade: bevel-edged plexiglass sanding blocks. |
I generally work on the bottom of the rebate first, coming down close to the lines I've drawn. I can check the flatness of the bottom surface with the engineer's square, but the best check is to hold the peg box in place, and look for gaps at edges and corners. I can also press the peg box down, especially at the outer edges, to see if I can feel any rocking. It should go without saying that by the time I've finished fitting the joint, there should be no rocking at all, and the peg box should be completely solid.
With the bottom of the joint very close, I can pay more attention to the back side of the rebate. I check for flatness by pressing the peg box into the joint at the corners--if I see any side-to-side rocking at all, I know I've got work to do to flatten the back of the rebate.
 |
| One spot where the peg box can be held out is along the very back corner of the rebate. I clear this corner with sharp chisel and knife. |
 |
| While I'm fitting the joint, I also want to keep an eye on the peg box angle. It doesn't particularly matter if the peg box angle matches exactly the angle that I've made on my working drawing. However, a few months back I made a case drawing from that working drawing, and it would be best if the lute conformed to that drawing as much as possible. I would hate to make a lute that didn't fit in its case! |
 |
| There's my fit, and it is as tight as I can make it. I have a few operations to do before I glue the peg box on, and I will eventually size the joint (both the peg box and rebate surfaces) and re-fit it, but for now this looks very good. I can finalize the dimensions of the peg box, and start fitting my chanterelle rider and bass rider. |
By the way, don't be alarmed that the peg box looks a lot wider than the neck rebate--that extra width is on purpose. The treble side of the peg box fits flush in the rebate, while there is about 10mm or so of overhang on the bass side. You will see the reason for this in my next installment.
My working drawing tells me what the final width of the peg box should be, and I can now plane the peg box cheeks down close to those final dimensions. However, as with the other parts of this fitting operation, those dimensions are ideal, and must be set aside in favour of the dimensions as I find them on the lute. So, I plane the bass and treble peg box cheeks alternately, keeping their dimensions as close to identical as possible, but I keep my eye on the developing fit of the treble side of the peg box in its rebate.
 |
| I use my planing box and low-angle block plane to trim the sides. |
 |
| Here's the fit that I'm looking at. I want the angle of the peg box cheek that I'm planing to fit the edge of the rebate as closely as possible. I (and I hope you) can see just the smallest bit of the bottom of the rebate in this photo. It's a pretty close fit, though I might just take one plane stroke on the outer edge of the peg box cheek (the left side of the cheek, as we view it) to bring it a touch closer to flush. Then I will check it one more time, and then (I hope) call it a final fit. |
With the peg box now at its final dimensions, I can start fitting up some attachments and doing some final shaping inside the peg box. First attachment is the chanterelle tuner.
 |
| I cut blanks from a piece of quarter sawn pear. |
 |
| After cutting out and shaping at the bench, I mark the cheeks and take the piece to the band saw. |
 |
| The photo's a bit out of focus, but you get the idea: wedges tilt the piece so I can do the cutout at the correct angle. |
 |
| Then I can finish shaping the piece with files in the swivel vise. As you see, I've relieved the inside corners with a small file. (I do it at this stage, because it will be much more difficult to do once the tuner is glued into the peg box.) The little dart at the back edge is a feature I use for pretty much all the chanterelle tuners I make. It's derived from the Schelle bass rider (which you'll see next episode), but I think it gives a nice finished shape to the chanterelle tuner too. |
 |
| These are my marks for the chanterelle tuner rebate. The front line is perpendicular to the peg box cheek, while the back line is at about a 10° angle. |
 |
| With the chanterelle tuner's location marked, I can carve in the bottom block, using a pair of skew chisels. (A little water brushed on the block makes this carving a lot easier.) |
 |
| I cut these lines for the rebate flared at a slight angle outwards. You can't see in this photo, but I've drawn a line with my marking gauge at a depth of 2.5mm, which will be the depth of the rebate. |
 |
| I remove most of the material with my dremel router base. |
 |
| However, I still need to finish the rebate with chisels and files. |
 |
| I'm about to start fitting the chanterelle tuner into the rebate. What I'm doing here is marking the bottom of the tuner, for reference, with a series of lines at the same angle as the back edge of my rebate. |
 |
| I then fit the tuner by trimming the back edge, with my low angle block plane set very close. I follow the reference lines, and tilt the plane slightly to get the correct compound angle at the back edge. |
 |
| I proceed very carefully, checking the fit often. The front edge is at 90°, so I don't have to worry about that. The angled back edge is the only one I trim. |
 |
| It's easy to see how the fit is developing, and which angles need adjusting. |
 |
| Almost there. |
 |
| There it is: the fit is nice and snug. The tuner overhangs about 1mm inside the peg box. |
 |
| Now that that's fitted, I can do a last little bit of carving inside the peg box: a little bird's mouth in front of the chanterelle tuner. |
And now that the peg box cheeks are at their final dimensions, I can fit an ebony veneer cap at the tip of the peg box.
 |
| A bit out of focus, but nice and flat. |
 |
| I glue this piece on at the same time as I glue on the chanterelle tuner. The veneer is slightly larger than the peg box tip, and I've backed it with a piece of plexiglass. |
 |
| I put hot hide glue on it, stick it in place, and hold it there for a few minutes to let the glue set. |
 |
| Then I start putting pieces of tape on it, with light pressure at first, then longer pieces with a stronger pull. |
 |
| That should be plenty of clamping pressure. |
 |
| And here is my gluing rig for the chanterelle tuner. Actually, this is the very first time I've ever used a shaped caul like this to glue in this piece. I'm not sure why--maybe it was because I knew I'd be blogging about this, and wanted to glue it 'properly.' But to tell the truth, I don't think it needs this. I usually just put glue on both surfaces, and slip the tuner in place. The compound angles at the ends of the rebate provide excellent clamping pressure, and the tuner will not move. (It will also never come out of its place on the finished instrument, unless there's a sledgehammer involved.) |
 |
| Next day: trimming veneer. I do this with my low angle block plane, which works well even on end grain, which is what I have here. However, I must dock the corner (with a chisel) first, or the plane will tear away the side of the veneer. |
 |
| That's my result with the block plane--all that's left is to make flush with files. |
 |
| Like so. |
 |
| And here's my chanterelle tuner, with excess glue removed, awaiting in-carving. I've sketched a few lines to guide my shaping. |
 |
| It's not the easiest piece to hold--I brace it up against the bench edge with a piece of leather to guard against marring or denting corners or edges. I do most of my work with a small, curved knife blade, cutting across the grain. |
 |
| I also use fine files, and a number of small scrapers that I've made from x-acto blades. The curved scrapers are most useful for this job. |
Here are some views of my final shape on the chanterelle tuner.
 |
| It's a rather complex shape to make, and it's large enough that there's a danger of ungainliness if it's not done right. I try to get my lines smooth and a little stout, I would say; I don't want them to be weak. |
The final shape of the outside of the tuner is not based on an historical lute, but is of my own design. I shape it to recall the
nazar, the 'evil eye' charm that one sees in many middle eastern and south asian countries, which I first encountered on a trip to Istanbul many years ago.
And that is all for today. Next time: the bass rider, and gluing the peg box in place.


No comments:
Post a Comment