In today's post I have a number of small and relatively unspectacular jobs to describe, all leading up to one big and quite spectacular job--gluing in the belly of this 13 course lute.
In our last episode, I glued and shaped the sitka spruce fingerboard spacer, and then made final action adjustments by slightly lowering the edge rib. Along the way, I checked the action by stretching out lengths of nylon fishing line from the bridge to the nut, using graduated wooden spacer blocks to measure string heights. Everything looked in good shape for gluing in the belly.
As I finished up the last post, I said I would have about a dozen little jobs to do before I could tackle the big one. That was just an estimate, not a precise count. So here's what I did--let's see how many there actually are.
1. Make a belly drawing.
This is a full-scale drawing of the belly done on a sheet of drafting paper. It's not a theoretical document, but a practical record of the belly as I've made it before gluing into the body. I first trace around the belly, and project the locations of the bars using a straightedge. Then I measure and record belly thicknesses and bar dimensions. I also include information such as the amount of curvature I have put into certain bars during gluing, the weight of the belly, and so on. On the right hand side, I've left space to write comments on the various thicknesses and characteristics of the materials I've used on the whole lute, such as the material and thickness of the ribs, the materials used for the bridge (and the weight of the bridge), and impressions of the soundboard gained through tapping and flexing throughout the joining and thicknessing processes. I also write down specific musical tones and overtones that I hear when tapping both the barred belly and the body, and any impressions I have about (as the case may be) the freedom, restriction, richness, complexity, loudness, balance, etc., of the sound of the belly as I tap it in various places, both on and off the bridge. This drawing is for my files, and I have one of every lute I've made.

 |
| Projecting the location of the bars. |
 |
| Measuring and recording belly thicknesses. |
I have three lutes on the go, so I will need three labels. I use some medium-thickness watercolour paper, and a jar of black ink into which I dip a calligraphy pen, and just sit down and write labels for about 5 or 10 minutes. I am by no means a skilled calligrapher, so I just make a bunch and choose the ones that look best, that are clear and have a nice balance and energy. Nobody's going to spend too much time looking at my label, but I want it at least to be legible through the screen of the rose.

 |
| I make sure to stick it down at exactly the position of the rose. |
3. Chamfer the front edge of the top block/fingerboard spacer.
This is a standard procedure I do for all lutes, and it is meant to assist a future repair person who might, at some point (far off in the lute's future, I hope) want to remove the belly. The chamfer allows a palette knife to slip more easily between the belly and the block/ spacer.
 |
| Note that I don't extend the chamfer all the way over to the edge rib, but instead finish it a few millimetres away in a 'lark's tongue.' |
4. Drill a pilot hole for a strap button.
I do this after the final action adjustment (i.e., after trimming the edge rib) so I can be sure to locate it a specific distance from the edge of the bowl. I make the hole big enough that I can fit a small reamer into it. (I'll fit the strap button after varnishing.)
 |
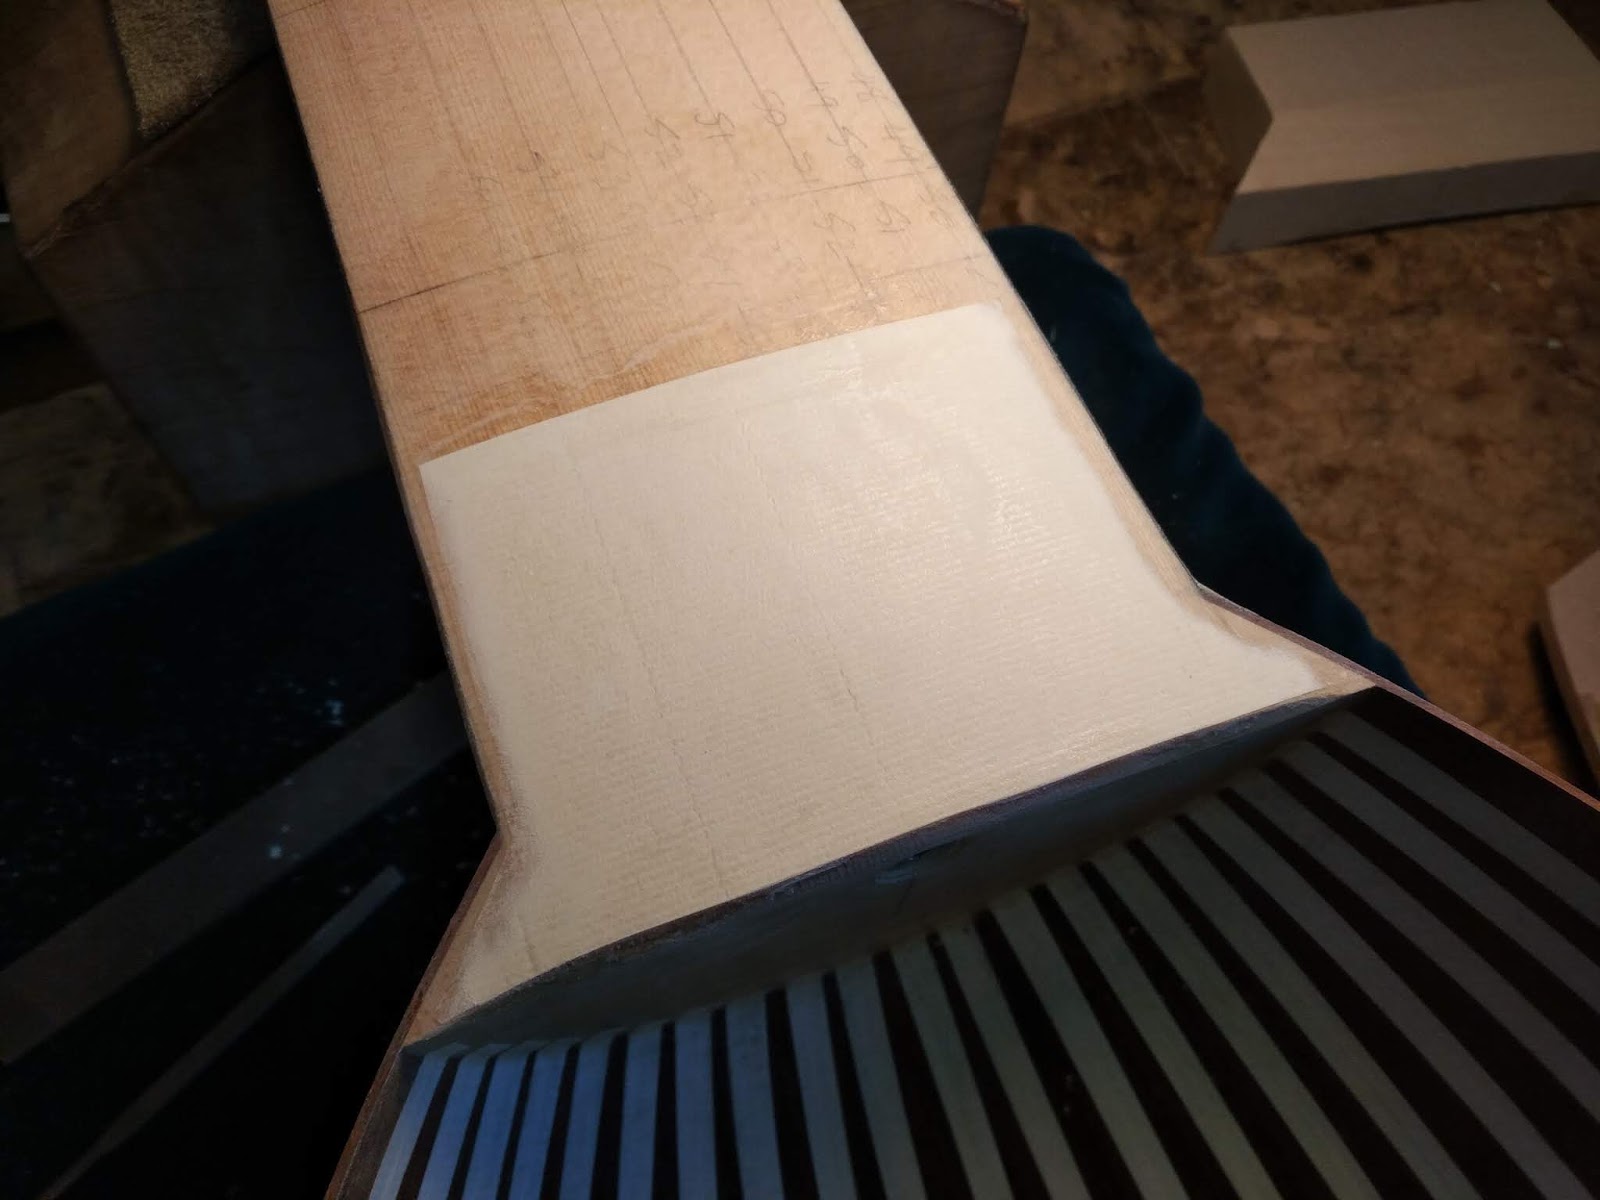
This is a piece of handmade paper that covers the top block/fingerboard spacer and extends a little way up the neck. The 'tongue' of the belly will eventually be glued down over it. During the life of the lute the belly will be securely glued, but should a repairer eventually need to remove the belly entirely, the layer of paper will make removal in this area much easier. I have had occasion to remove a belly that was not glued with this paper layer--that is, glued wood-to-wood--and it took a long time, was destructive to both the belly and the top block, and necessitated some careful rebuilding of the belly before re-gluing. It's much better to think ahead, and be kind to a future generation. (A good motto in all we do, in my opinion!)
 |
| I saturate the paper with glue and rub it into place--much like I did when I glued down the rose pattern, in in episode 6. |
 |
| When the glue's dry, I feather out the edges of the paper with files and a small sanding block. |
6. Make a caul to fit the top block/belly tongue.
With the paper layer in place and the edges feathered, the top block area is in its final shape. Now I can create a caul that will fit that area perfectly, and hold down the belly tongue securely when I glue it.

This is my top-block gluing rig, in two pieces. The top-block caul itself is on the right. It's a piece of jelutong that I've cut out to fit the area exactly, then carved to fit the countour of the fingerboard spacer/top block. I've covered it with a layer of cork, then added a strip of masking tape along the edges to make sure that it will press down the edges of the belly when I glue it in.
 |
| Here's what it looks like in a dry run: two wooden cam clamps supply ample pressure. |
 |
| And a side view. |
 |
| I mentioned in the last episode that one of the things I needed to watch out for when shaping the top block and fingerboard spacer was whether the belly, with its arched upper braces, would fit closely, especially at the outer edges. Now I have my answer: the belly fits well. |
7. Dehumidify the workshop.
This is part of my routine in the workshop everyday. Weather conditions are such that I need only keep my small space heater running on low to maintain a humidity in the low-40% range. Today it is at exactly 42%, which is perfect for the job I'm about to do.
8. Prepare the glue.
The night before gluing the belly, I soaked two normal batches of hide glue. They will both be ready for heating and use in the morning.
9. Give the bowl and belly a final brushing-out.
Just to ensure that no little bits of dust or wood shavings will be rattling around once the belly's glued in.
10. Tape the belly in place with masking tape, spaced approximately 2" apart.
The belly should fit exactly. I take one last look all the way around to make sure that the belly will fit down tight onto the edge rib. I also make sure (one last time) that the outline looks good, and that no ill-fitted bar ends are going to elbow out and make a bump in my beautiful shape.
11. Assemble all tools and materials on the work bench.
I will need: a soft pad (a folded camp blanket covered by a sheet of soft cloth) along the edge of the bench; the top block gluing caul assembly, including two wooden cam clamps; 1" masking tape dispenser, clamped to the bench edge; an electric iron, on a medium-high setting, along with a cotton cloth folded in four; hide glue warming in my glue pot; my glue brush and palette knife. I think I'm just about ready.
 |
| My glue, glue brush and palette knife. Note that I've cut off most of the knife handle, so that it's easier to use (and less likely to tip over my glue jar.) The glue, by the way, is very dilute: I've probably added twice as much water to it as I would for a normal batch of hide glue. |
12. Chose music to listen to.
 |
| This operation will take about a half an hour, so I need to choose the right tunes. Here's what seemed right today. |
And so we begin. Most of the photos you will see below are from a staged series of dry-runs. Once I get started, it's nearly impossible for me to stop work to organize a timer shot, so these photos are the next-best thing.
 |
| Here's the view as I begin. I hold the lute in my lap, against the padded bench edge. The glue is close by, and just beside it, my tape dispenser is clamped. |
 |
| Starting on the bass side, I locate the first bar above the rose, and from that point down toward the bottom of the belly, I lift the tapes. |
 |
| With my left thumb I lift the edge of the belly slightly, then dip the palette knife in the glue pot and get some glue into the seam. I work in about 4-to 6-inch segments; I don't want to slop a lot of glue in, only make sure that there is some on both sides of the joint, the belly and the rib edge. |
 |
| Here's another view of my dry-run demonstration. Once I have sufficient glue in the seam, I will pull down the tapes and reattach them, then add more pieces from the dispenser. |
 |
| As I work my way around the belly, I turn the lute in my lap, and hold it securely against the bench. |
 |
| Here's a shot from the actual gluing process. I secure the glued area with a complete coverage of masking tape, but I leave the leading edge of the glued joint untaped so I can work a little glue back into it before moving forward. |
 |
| Eventually I get all the way around the belly to the treble side, to the first bar above the rose (where I started gluing on the bass side.) Now I can lift up the belly tongue, and use the palette knife to spread glue under it and down each side to the point where I've already glued. |
 |
| With the whole perimeter securely taped, I can now get my top-block caul in place and tighten up the clamps. I check for good fit and squeeze out around the top block area. |
 |
| Finally, I run over the whole perimeter with the medium-hot iron on a folded cotton cloth. I don't want to press down with any force; I only want to apply a little extra heat to the glued joint. |
Although it's a simple and secure process, there's a certain finality that I feel at this stage. It feels a bit like a capsule has been sealed, with all one's experience, knowledge and hopes for the future inside. So much preparation has been built-in to this point; all the work I will do from now on will be to bring it to fruition.
I'll see you again soon!
You say the glue is mixed twice as thin is as normal. Am I right to think that this too, like your chamfer on the top-block and the paper under the belly tongue, is to make it easier to break the joint cleanly, should it ever be necessary to open the lute? Also, what Bloom strength is your glue? I can imagine that a strong but thin glue would be the way to go.
ReplyDeleteI imagine you, like any other instrument maker, must wonder what our forbears did in the days before masking tape! I'm surprised to see you using the plain old beige stuff--no fancy blues and greens. I would worry about its gooey adhesive sticking to the wood, especially after applying heat with the iron. Says the guy who's never tried it...
Hi James, thanks for your questions. For this part of the assembly, I use some 192 GS hide glue from Bjorn Industries. It is thus not the strongest glue to begin with, and thinning it more than usual makes it weaker still. However, it seems to be more than adequate to keep the belly glued to the body. (When you think about it, the perimeter of the body, including the top block area and the counter-cap at the bottom, provide a pretty large and secure gluing surface altogether.) You're right in thinking that I thin the glue to facilitate removal of the belly for repairs. I've had occasion to remove bellies that were attached with full-strength glue (my own, early work) and with half-strength glue (a baroque lute by Ray Nurse), and I can tell you which I prefer! I guess it might be possible to make the glue too thin, but I'm pretty careful about it, and I'm pretty sure I err on the side of caution.
ReplyDeleteWe do have some idea of how early makers might have worked, courtesy of Thomas Mace, in Musick's Monument (1676.) In it he describes in quite a lot of detail how to remove the belly (including lace), how to fix cracks and other problems with the belly, and then how to stick the belly back in. He describes using an awl to "prick a Hole quite through the Belly” into the top block to use as a locating mark. “Now to your Glew-Pot, with Back and Belly, and begin with which you pleafe, and anoint all the Edges Carefully round, where you know they muft Joyn […] then (having a Good Fire ready) bring Both to the Fire, and warm them a little, and clap them quickly together [….] Now having in readinefs your Great Iron, red hot, heat the Edges thorowly all over, and then efspecially the upper Flat where your Aul fticks, till you perceive the Glew is become warm and thin.
"Then begin with your upper Flat, and with your Fingers you may Force it clofe to its old and true place, and then with little pieces of Paper, (fo big as pence, or two-pences, wet with Glew) cover all the upper Flat in the Joynts, yet leaving about a Straw-bredth or two betwixt Paper and Paper, fo that you may fee how the Joynt joyns, and prefently fcorch on thofe Papers, one after another, leaning pritty hard upon each one, with the fquared end of your broad Iron, which muft not be too Hot, for fear of burning the Belly, yet hot enough to fcorch the Papers, and the fuperfluous Glew, into a Crustinefs."
I’m happy enough to use masking tape. The tape, incidentally, must be removed pretty carefully, or it will tear out wood from the belly. A few tricks: you can wet the tape beforehand and let it soak a bit before removing; you can warm the tape with a hair dryer; and you should always pull the tape directly across the grain (never along it). It also helps to be aware of the runout of the belly you’re working with (and if the belly has any figure or swirl, that direction is likely to change as you go along.)
Dear Mr Carey,
ReplyDeleteI am amazed at your generosity. I am a newcomer to your blog, and I am so grateful that you are sharing your experience, knowledge, and wisdom with the rest of us.
I confess I have yet to begin building a lute (eventhough I've owned Robert Lundberg's book since the day it was published: too many children to feed, etc.).
I hope to begin soon - before I am too old to finish one - but even if I don't, you should know that I count myself privileged to have seen your work.
Ever grateful,
Stanton
Dear Stanton,
DeleteThank you so much for your very kind comment. If I ever had cause to wonder if anybody cares whether I write the blog or not, I don't anymore. It's a pleasure for me to do it, and the sentiments you've expressed here are more payment than I ever expected. I am truly humbled. Now please: build your lute!
Best, Travis
Thanks Travis for a great series so far!
ReplyDeleteSpeaking of "paying it forward"... I just recently read an article from the 80's of a lute maker who used hot hide glue, but... for glueing the ebony half-edging, used Titebond so the binding stays in place if the top needs to be removed. Seems like a somewhat logical idea but I've never heard of it before. I had to open an instrument recently and destroyed the binding in the process so the repair took a lot longer than it should have. So, I'm on the fence about not using hide glue for this one thing. Hmmm...
I'm guessing this will be addressed later in this series, so no spoilers!
Thanks Bill! The idea does sound logical doesn't it. The only problem I have with it is that I don't use Titebond, only hide glue. I cast no aspersions on those who do, however... I prefer to just use thinner glue for the belly joining, and thicker and/or higher gram strength glue for the binding. I too have caused harm to bindings while taking up a belly, but I've come to believe that a more judicious use of moisture on my part (along with heat from an iron) to loosen the glue in the belly will help to keep the old binding in place. By the way, it seems to me that one of the reasons why 17th century makers favoured a 'lace' or parchment binding was that by the time they got round to making wide-necked lutes out of old narrow-neck ones, the belly edges and bindings were so chewed up that they a) needed a cover-up and b) needed a way to ensure the belly would stay stuck down to the body!
ReplyDeleteThis comment has been removed by a blog administrator.
ReplyDeleteThis comment has been removed by a blog administrator.
ReplyDeleteThis comment has been removed by a blog administrator.
ReplyDelete