I get a kick out of work, but I also get a kick out of
talking about work. I've been lucky in my life to have toiled alongside people who like to play with the language to talk about their labour--it's always fascinated me, and always made the workday more fun (and pass more quickly).
The habit of mixing work and words started early for my brothers and me, growing up on the farm in northern Saskatchewan. The three of us read
To Kill a Mockingbird in high school English class, and whatever else that novel taught us, it gave us an expression to describe a certain kind of work:
bustin' up a chiffarobe. It's what Mayella Ewell asks Tom Robinson to come into her yard to do, and as we know, it's an act that has some very serious consequences for all concerned. For us kids, it was just an outlandish expression: what on earth is a chiffarobe? And why on earth would somebody want to bust one up?
Anyway, the phrase stuck, as these youthful obsessions sometimes do, and it came to connote a type of work that usually involves hard (and possibly pointless) labour, that's emotionally conflicted or emotionally dangerous, and maybe even physically dangerous too. To this day I can phone up my brother Roger and ask him what he's been up to, and if he answers "bustin' up a chiffarobe" I know exactly what he means.
Another example. A few years back I was helping out some friends at their screen printing business. During some down time, I spotted a rack that held several large rubber squeegees. To me, they looked in danger of falling off their narrow shelves, so I took it upon myself to tack a strip of wood on the front for a lip, to better hold them securely. Somebody asked, hey, what's Travis up to? and somebody answered, he's over here betterizing a shelf!
Betterizing--I liked that. It fit exactly what I was doing. I wasn't improving something; I was
making something better.
It's a strong impulse with me, the betterizing impulse, and has been since childhood. It's stood me in very good stead as a lute maker. I think it's an impulse that every lute maker must have, to a greater or lesser degree. The
Lee Valley Catalogue will sell you many things, but it can't sell you everything, and so you have to be prepared to betterize an existing tool to make it fit your specific needs.
Such fixes don't need to be elaborate. This week, for instance, I was gluing bars on the underside of a couple of lute bellies, and then planing them to their finished heights. As part of my routine of finishing the profiles of the main bars, I chamfer their edges (a feature that's seen universally on old lute bellies). To do this, I've been using a Veritas miniature shoulder plane from Lee Valley tools. While it's a wonderful little tool, it's really not the right one for this job--the sole's a bit too narrow, and if you go off track with it, the exposed corner of the blade can dig in and hack your work.
This using-the-not-quite-right-tool-for-the-job is the kind of thing that could go on for years, like a leaky faucet. But instead of running (credit card in hand) to the
StewMac catalogue, I thought, the plane's fine, but what it really needs is a fence on the side, to guide it along the edge of the bar. I looked around the shop, and found a little slip of spruce, a soundboard off-cut, that did the trick.
Now, how do I hold it in place? My fingers? Tape? Some kind of clip...? Over there, on the desk... will it fit? Yes! Perfect.
But does it work?
Yes indeed it does, like a hot damn, in fact--better than some brass fingerplane I now don't need to shell out 50 bucks for. The whole unit's solid and stable, and the fence is easily switched to the other side of the plane, for working on the opposite side of the bar. A tool betterized, a job made easier, money saved. My heart sang a tiny song of victory.
Now, onto bigger fish.
I actually made this piece in 2009, when I was working with
Grant Tomlinson. Grant was going to be away for a few days, so I was on my own in the shop. Rather than create some sort of
sorcerer's apprentice type of situation by working on lutes while he was gone, I took the time to build something that I'd wanted for a long time: a router base for my Dremel rotary tool.
Mainly I wanted this tool for cutting the small channel for the edge binding around the soundboard. Now, numerous companies (such as StewMac) will sell you a Dremel router base, and it might work for this purpose... but most of the ones I've seen are either too heavy, or can't be adjusted properly, or don't have stops that register correctly against the soundboard and outside ribs. In short, they may work fine for a guitar, but not for a lute. If I wanted something that did exactly what I wanted, I'd have to build it myself.
This looks like a job for--the Betterizer!
Here's what I came up with--
I didn't begin with any master plan--all I had was an adjusting screw mechanism that I'd cut out of an old block plane, and I built around that. I knew I wanted to use this screw to adjust the cutter up and down, so what I had to do first was find a way to mount these pieces in the polycarbon material I was using for the job. I just made some tight-fitting cutouts for them, and that worked fine.
Once I figured that out, I was off to the races. I built a carriage that I could screw the Dremel tool into (the neck of that tool is threaded), and a base with a hole cut in it, through which the cutting bit is lowered. I also drilled a hole for a bolt through the back of both carriages--the hole in the back of the base is actually a slot, as you can see. When I've adjusted the cutter to the correct height, I can tighten the wingnut on this bolt, and that locks the cutter securely in place.


This is a view of the bottom, and it shows the guide attachment I made for cutting the binding channel in the soundboard. The little tongue of material that my thumb is pointing towards?--that's what sits on top of the soundboard. The little round, serrated thing to the right of my thumb? That's the cutter head. It's peeking up just above the width stop--I can loosen the two screws you see here to adjust the width of the channel (the screw on the right actually has a slot, so I can move the plate forward or back, exposing less or more of the cutter).
Here's a couple of shots of the thing in action--

And a shot of the slot that it cuts. Pretty nice result!
(By the way, if anybody's interested in having a closer look, I've added a few more photos of this tool on a flickr page,
here.)
Okay, one last thing. If you insist.
One of the most useful pieces of equipment in the lute shop is a pull-through scraper. It's used to create batches of uniformly-sized strips of wood, such as soundboard bindings, or rib spacers. Maybe these scrapers are available commercially, though I've never seen one. I got the idea for mine from an article I read in
American Lutherie a few years back--a Spanish-trained guitar maker was talking about how he made the tiny strips of wood for mosaic-pattern soundhole rosettes. What a job: hundreds of strips of wood of different colours, glued together side by side into sheets, then the sheets glued togther into loaves, then slices taken from the ends of the loaves and glued side by side into a circular channel cut into the soundboard around the soundhole--far too much work. Give me lute making so I can slack off a little!
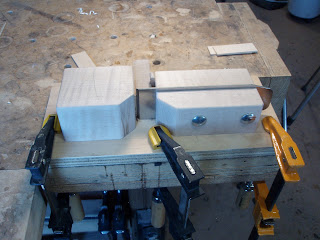
This is the unit I made, and it resembles quite closely the guitarmaker's setup. (More pics can be found
here.) There's a plane blade on its side between a couple of hardwood blocks; the front edge of the blade sits close to another flattened hardwood block. (The blade can be slid forward and back, and secured in place by tightening wing nuts on the bolts.) To use the tool, put your strip of wood between the blade and the block, snug up the tip of the blade against the strip of wood, tighten the bolts, and pull the strip through. If you've set it up right, the blade will take off a thin shaving. Flip the piece end-for-end, and run it through again; then do the same for all the other strips in your batch. Then snug up the blade once more, and then run all the pieces through again. Do this process a few dozen times, with a few dozen pieces of wood, and presto! you have a nice batch of uniformly-sized, flat- and parallel-sided strips.
One recent job I did demanded something a little more accurate. Often these strips come out of the process with flat, parallel sides, but they're kind of trapezoidal in cross-section. This is not a big deal if all you want is a normal set of rib spacers, but I was working with something a little more complicated--a triple spacer, made of rosewood sandwiched between strips of holly. If I wanted the three strips to be equal thicknesses, I needed to make sure that the sides were square to the bottom and top.
I wanted the final thickness of the spacer to be 2.4mm, so each strip needed to be 0.8mm wide. I first thicknessed (with a thickness sander) a slab of rosewood to 0.8mm, then glued slabs of holly to either side, making a holly-rosewood-holly sandwich.
(I left the holly pieces a little extra-thick, about 1.0mm each.) I then cut the sandwich into strips about 2.5mm wide, and began the pull-through thicknessing for each piece.
To keep the strips square-edged, here's what I did--just behind the blade, I wedged in place a small, flat block of maple. As I pulled each strip through the scraper, I used a slip of hardwood to press the strip downward onto that block. I figured if I did this every time I pulled the strip through--and if the surface of that block was at a right angle to the blade--I'd end up with square-sided strips.
And that's exactly what happened! Betterizer strikes again!
Of course, I also had to be quite careful, while running the strips through, to scrape an equal amount off each side, so that one outside strip didn't get wider than the other.
Thankfully, there aren't too many lute models that use this kind of spacer--making them was fun, but a bit demanding. These spacers I used for a new 12 course lute, based on a 15-rib Sellas archlute back. The original, in the
Victoria and Albert Museum, has ivory ribs, with ebony-ivory-ebony spacers; my version has rosewood ribs, with holly-rosewood-holly spacers. Check it out.
And that is all--except for one thing. This weekend is Father's Day, and it's also my Dad's birthday. Wallace William Carey died in 2001. He would be 77 this year. While he was not a lute maker--he was a farmer and mechanic--he was a Betterizer of the first order, and watching him work, and watching the way he worked, was a big part of my education as a craftsman. He was determined and dedicated, and happy at his workbench. I miss him, and still learn from him every day.


