Hi there. Today, a small, crucial, highly-detailed and finicky item, the bridge.
My favourite material for making bridges is plum. I search high and low for it, and good quality stuff is perhaps surprisingly not easy to find. The tree grows everywhere, but most of what I see for sale has such twist in the log that it's impossible to use for anything but the smallest items--tuning pegs (if I'm lucky), or more likely end buttons. Most of what I've seen could, sadly, be best used as firewood.
Yet every once in a while a log or a board will come my way that has enough straight growth in it that I can use it for bridges. For a bridge blank, I need a width of about 20mm (that's the dimension that's quartered), a height or thickness of about 12mm, and a length of around 200mm (depending on the number of courses and length of the bridge.) If I find such a log or board, I covet it, and cut it very carefully to yield as many bridge blanks as possible. Only the best, straightest sections of it go for bridges; smaller pieces will be used for pegs. (For this purpose not only is it beautiful to the eye, it also turns well, and is stable over time and wears well in the peg box.)
The main reason I like it for bridges is that it is one of the most beautiful sounding woods I have ever heard. If you get the chance, tap a couple of pieces together, and listen. Plum makes a magical, bell-like sound that is both pure and rich, and I want that sound to be part of every lute I build. Every piece of wood in the instrument has its own beauty of tone to bring, but they are all different, like different beautiful voices in a choir. The best choirs blend those sounds into a single voice, and the result is greater than the sum of the parts. That's what I hope, and want, for my instruments.
And so to work.
(By the way, the model I'm using for this bridge is from the 13 course lute of 1727 by Sebastian Schelle, in the Cité de la Musique in Paris. You might see a photo of it in one or two of the photos in this blog post. This lute also serves as the model for many of the features of the peg box, as we shall eventually see.)
 |
| Here's my blank. I've flattened the bottom first, with my low-angle block plane. If you look carefully at the photo, you will see on the right end of the blank that I've drawn an arrow in pencil--this marks the best planing direction for this piece. As you'll see if you tune into the next episode, I will want to know that direction later, after the bridge is finished, and I'm ready to glue the bridge on the belly. |
 |
| Here I'm shooting the front edge of the bridge. I want it straight and perpendicular to the bottom surface. |
 |
| When I've got those two surfaces, I can begin marking out the length and width(s) of the bridge. Like most if not all lute bridges from the period, this one tapers from bass to treble end... |
 |
| ...as you see here. I've now got bottom surface (facing up), and front and back sides. |
 |
| Now the top. I set the piece in this jig, which allows me to plane a slope into the top surface with my low-angle block plane. (Again, the back-to-front slope is characteristic of most authentic lute bridges.) |
 |
| Here's a look at the jig. There's a slot or edge on each side of it, allowing me to plane the sloped top surface (on the left side) and the sloped back edge (on the right side, as you will see in a minute.) |
 |
| Like the original, this bridge is going to have an ebony cap, that's slightly more than a millimetre thick. If you take a close look at the photo, you see a sloped, cork-lined caul on the top (the slope matches the slope I've planed into the top surface); below that, a piece of plexiglas as a non-stick liner for the caul; below that, the ebony veneer; below that, the bridge itself; below that, a caul with a gentle curve of about 1mm planed into its length. At each end there are two aluminum pins, which allow me to locate the plexiglas, veneer, and bridge. |
It occurs to me that interested readers might have one or two questions about what I've just described. Please feel free to leave them in the comments section at the bottom. I will anticipate one here: why do I place a caul underneath everything that has a 1mm curve planed into its length? Answer: I want this bridge to have a slight curve or crown to it, and the best way to ensure that it does is to incorporate it at this stage, when I'm gluing the veneer to to the top. When I remove the bridge from the cauls and clamps, that curve will be there, built-in. As you'll see when I describe gluing the bridge to the belly in the next episode, I will incorporate the curve into that gluing procedure (and if you remember
my description of gluing the braces on the belly in the 7th episode of this series, I did the same thing then.) All will become clear in the fullness of time, I pledge it!
 |
| Here's the result, with ebony edges trimmed close to the sides of the bridge. |
 |
| Here you see clearly the taper from bass to treble end. You can also see where I've marked out the final width of the top of the bridge; I will now plane the back angle into the right side of the bridge. |
 |
| The plane, in action. As when I planed the top slope, all I need do is hold the piece lightly against the jig, and let the pressure of the plane do the rest. |
 |
| My result: the top to its final width, the sloping back surface to its final dimension, and--if you look carefully--about 1mm along the bottom of the back side that I haven't planed the slope into. I don't want where the back slope meets the bottom to become a knife-edge, for two reasons: I don't think it will look good, and it won't be well supported when it's glued to the belly. |
 |
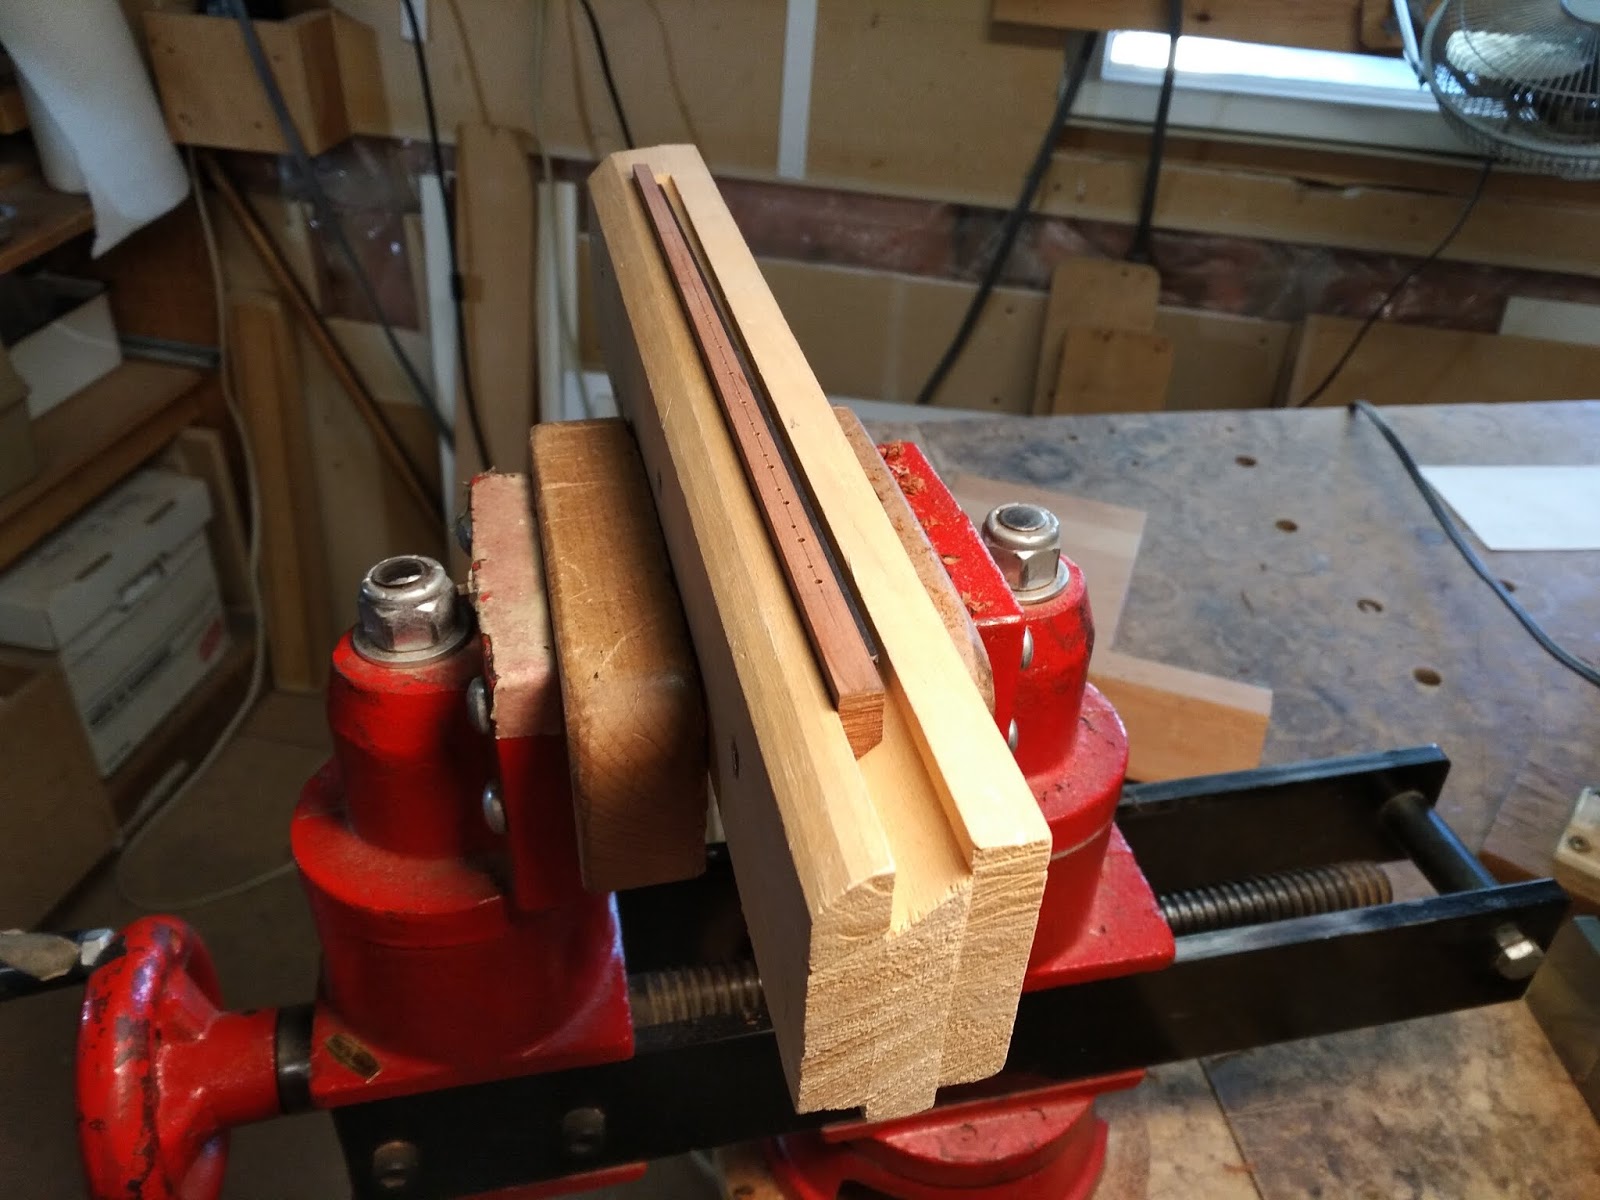
| Time now to drill the string holes. I have pretty specific sizes of bits that I use for each of the courses, and the strings within the courses (with 24 holes to drill altogether, I need to keep track of them carefully.) The bar of wood that the bridge is clamped to is sloped slightly--3 degrees, as you see written on it. I will drill through the front face of the bridge through to the back, which means that the hole will tilt slightly upward from front to back. (Again, this is a feature of the original bridge, and most originals from the period.) |
 |
| The bass side of the course gets a larger diameter hole. In addition, the octave on all the bass courses is drilled slightly lower than the fundamental. (By the way, the big brown waxy-looking block you see in this photo and the one above is a block of lead, which I inherited when I moved into my first shop space about 10 years ago. I use it to weigh down the drilling jig to keep it steady on the drill press platform.) |
 |
| Back to the vice for another jig. This one allows me to plane a slight slope (an undercut) into the front surface of the bridge. |
 |
| Then I can begin to cut recesses into the front and back of the bridge. Here's the front side: I make a knife cut, with a straight edge, down the line of string holes. Then I cut into that line, across the grain, with a small chisel. |
 |
| Here's what the first round of cutting with the chisel looks like--now I need to do the same from the opposite side. |
 |
| There's the result, tidied up with knives, files and small scrapers. |
 |
| Here's my sloping jig for cutting the recess into the back side. |
 |
| I use the same procedure here: knife cut on the string hole line, then cut in toward it with the chisel. |
 |
| Here's the rough result, before the final tidying up with files, knives, and scrapers. |
 |
| I'm finished with the shaping of the piece--now I can carve the finials on the ends. I mark them out with a pattern on the bottom of the bridge, then cut them out on the band saw. |
In this photo and the next three that show me carving the bridge ends, you can see that I'm working against a block of wood, which I sometimes cover with a soft piece of leather. If I have to make some chisel or knife cuts across the grain, as in the photo below, I might hold the piece against the bare wood to back up the cut--so I don't chip out material. If I'm making some free cuts with the knife along the grain, I will usually hold the piece against leather, so as not to mar it.
 |
| I need to be very conscious of grain direction when I'm carving these things. One wrong move, and a chunk of this bridge-end could break off--and I might be left with no choice but to start the whole process over, and make a new bridge from scratch. |
 |
| As it is, things worked out quite well with these bridge ends, and with the bridge as a whole. Here's the bass end, which I finished up with knives, files and scrapers. |
 |
| Here's the whole thing. I've left the bridge ends a little long--they will be cut back a little before gluing on the belly, and I'll fit them with ebony tips (be sure to come back for the next episode for all the exciting details.) |
 |
| To finish the bridge, I give it a couple of coats of a drying oil (T&T Oil, to be specific), and a vigorous polish with a soft bristle brush. (It should go without saying that I'm very careful to not get any oil on the bottom of the bridge!) Here it is with the dyed-black bridges for the two other lutes I'm building, a 7 and 8 course. |
And that's my story for today. I wish you all a fine week, and I'll see you next time for gluing the bridge to the belly. Cheers!


I have enough Plum to build a small shed with ....
ReplyDeleteYou'll have a beautiful sounding shed. How straight is the grain? Is it usable for anything, or does it twist like a barber pole?
DeleteA nice sounding shed for my Harley 1200...lol. Almost all of it comes from St.Louis, Missouri, where I live and I also work for the Government here as a Construction Inspector, Project Manager. When my friend in Forestry is asked to remove/whack a fruit tree, he calls me first. I buy the main trunk, some of it goes in the BBQ pit, some I sell, and of course the best I keep. You're so right about the musical knock it has !
DeleteThanks for the detail in these posts, Travis. Very helpful as I'm going through the "make a bridge or two" process (one slip of the chisel...). The angling of the string holes from front to back intrigued me. According to Lundberg the period bridges, like the 1592 Venere, were drilled in situ, after the bridge was glued to the belly. Given they drilled from the front, it would make sense that the easy path for the drill would be a slight up angle given the handdrills or gimlets they would likely have used. Or do you think this is a design feature? Anyhow, a fun topic. Thanks again!
ReplyDeleteThanks for excellent work detailing this build. Could you give details of the stringband dimensions and spacings? I can see that the spacing between courses is gradually reduced toward the bass side. Is the spacing inside the courses increased towards the bass side?
ReplyDelete