Monday, 25 April 2011

Disembodied hands

So, the bars are glued onto the underside of the belly...now what?

Now things start to move along relatively quickly.  If lute making was an action movie, the point we're at now would be at the beginning of a (really slow) car chase.  In a reasonably short time, a number of pieces are going to be fitted together, and things will soon begin to look an awful lot like an actual lute.

The first thing to do after the main bars are on is to glue on a number of small bars that support the delicate pattern of the rose.  Depending on the pattern, there might be a half-dozen or more placed strategically behind the rose:

Notice the ends of these little bars--I've scorched them with a hot iron.  This is because of another amazing property of hide glue.  While normally it takes a few minutes to set, and another few hours to dry hard, hide glue will crystallize instantly if it is scorched.  So, rather than clamping each rose bar separately, all you need to do is brush some hot hide glue on the bar, stick it down in place, scorch the ends, and voila--the bar is stuck down securely, effectively clamped at each end, and the hide glue in the middle can dry naturally over the next few hours.  I ask, is there anything hide glue can't do?

The larger bars have been glued on over-size, so the next job is to plane them down to their finished profile.  Here are a pair of disembodied hands doing just this work:

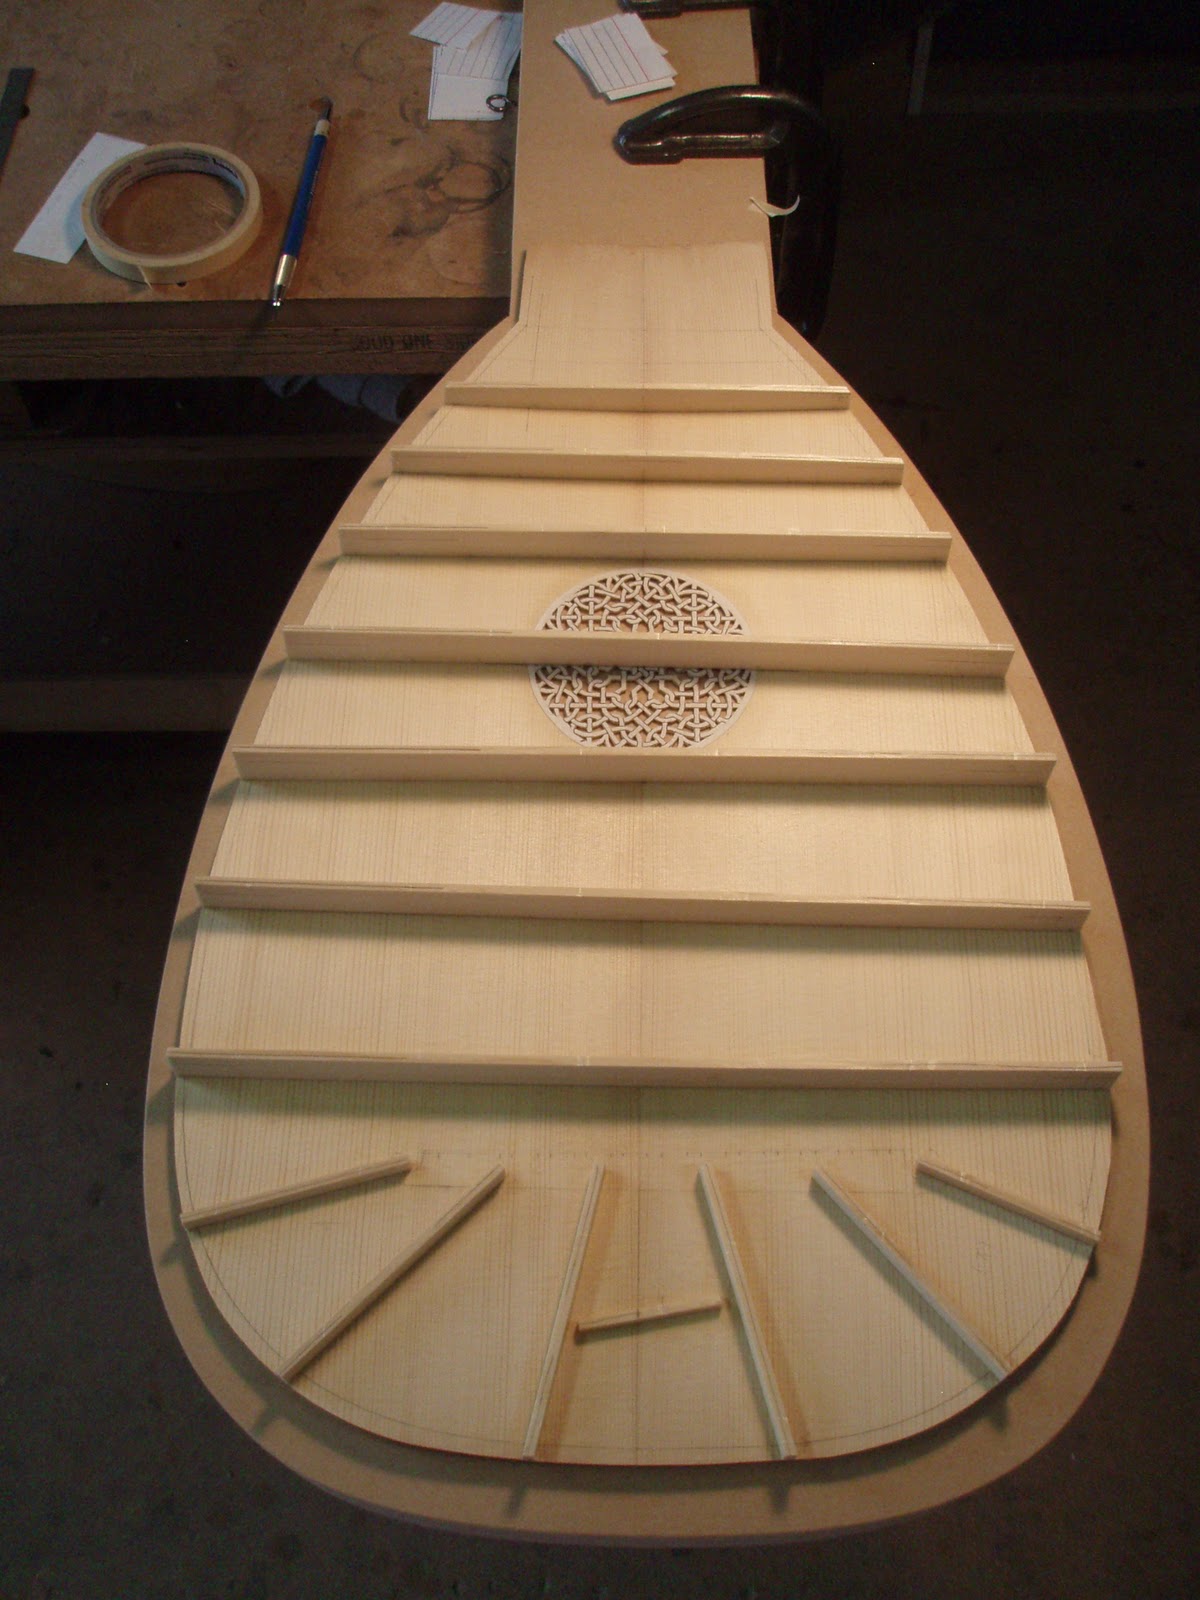
The bars are chamfered along their tops, and their ends are given a long, gentle scallop.  Here's what the 8 course belly looks like with this trimming done.

If you look closely at this photo, you'll see the outline of the lute's body that I craftily drew onto the belly just before gluing on the bars.  At this point,  I can trim back the ends of the bars until they are just inside that line, and begin the process of fitting the belly into the body of the lute.

I won't rely on just that line when I'm fitting up the belly to the body, however.  In fact, I'll spend a lot of time at the bench trimming bar ends, fitting the body over the belly, looking at the outline of the lute and the curve of the outside rib, making sure I've got a smooth shape all the way around.  This trimming and testing is the only way I have of making sure I'll have a good, smooth, aesthetically pleasing outline when the belly is eventually glued in.

Right now, though, I'm most concerned with getting a true and accurate fit because I want to find out where the bridge will be located (and glued) on the belly.  Of course, I have a theoretical location in mind where I hope the bridge will go--it's on the detailed drawing I made of the lute long before I started to build it. Theory and reality don't always exactly match up, however, especially when putting together such a complex machine as a lute. 
 
So what I do is carefully fit the belly into the body, and tape it securely in place.

Then I lay my detailed layout drawing on top of the lute, and see how theory and reality match up.

Hmmm... looks good.  Looks very good, in fact.  I flatter myself (and invite the wrath of the gods of lute making) by telling myself I must be getting good at this.

In fact, all three of the lutes in this batch look in very good shape.  I'm able to mark the location of the bridges on their respective bellies by using only a couple of pricks of a sharp pin.  Then, in a flurry of work and concentration, and following a carefully worked-out and time-tested routine, over three successive days I glue three bridges on three bellies.

If I've done my work correctly, I've created a glued joint on each that will withstand the combined tension of as many as a couple of dozen strings, and transmit the vibrations of those strings to the soundboard as efficiently as possible.

As with all of this, the proof will be in the playing... but for now, I'm very happy with the progress of these lutes.  


Sunday, 17 April 2011

The Innards

At the risk of stating the obvious, I have found that the work of making lutes consists largely of making things.  Cut a rose, carve a bridge, turn a set of pegs--there are just a lot of different items that need to be produced.  That's good: I like making things, and each day in the shop is different, so there's never a dull moment.  That being said, however, you can make a lot of things without actually making a lute. There comes a time in the process when you have to start putting some of these things together.

Most of the time, that will involve using hide glue.  Perhaps you're familiar with this stuff; if not, I'll briefly acquaint you.  

Hide glue is made from the hides and connective tissues of certain animals (and yes, horses are prime candidates for this job).  It's been used by woodworkers for thousands of years, though not too many woodworkers use it these days--synthetic glues are more convenient and readily available.  (Incidentally, my mom tells me that my Swedish great-grandfather, a woodworker who came to Canada in the early years of the last century, used to make his own hide glue.)

But nothing beats hide glue for putting together a lute, for a lot of reasons.  It dries hard and makes a very strong joint, yet with a little water and heat (and time, and much care!), any joint on a lute may be reversed.  This is especially important where the soundboard joins the body.  Most lutes will, at some point during their lifetime, need to have the soundboard removed for repairs or action adjustments, and this difficult job is made a little easier if hide glue's been used.

Here's what it looks like in granular form, straight out of the bag.

Put a scoop of this stuff in a baby-food jar, add a little water and swish it around.  Leave it for an hour or two to let the glue absorb the water, then heat the jar in a pan of water.   The glue becomes liquid, and it's ready for use.  So get to work!
Today's job is to glue bars on the underside of the soundboard (or the belly, as it's called in the trade).  These bars are "innards" of the lute, and they function exactly the same way your innards do: they provide strength and structure, and ensure that the whole body functions harmoniously (and keeps you singing sweetly....)

The barring patterns for these three lutes are all basically similar, but there are some important differences.  I don't want to launch into a big discussion of lute barring here--I'll only say that within some basic parameters, there are just about endless possibilities for varying the height, thickness, and location of one or all of the bars, and each of these adjustments will have an effect on the sound of the lute.  

I've devised a barring scheme for each lute, based on historical evidence.  I've selected barring material from my stock of fine European spruce, creamy-white, close-grained and stiff, and cut and planed each piece to the correct dimension.  My hide glue is ready, heated to the correct temperature and diluted to the correct consistency.  I'm just about ready to go....but wait.

In a minute, I'm going to be gluing a dozen or so bars to the underside of the belly--that's going to involve a lot of clamping.  I don't have enough clamps in my whole shop to do it, and even if I did, I couldn't put all those clamps on the belly at once--there just wouldn't be room for them.  I suppose I could glue a few bars down, let the glue dry, then glue on a few more, but the whole job would take days.  At the same time, gluing a few bars at different times and in different shop humidities might introduce tensions into the soundboard that could eventually end up cracking it, and causing a lot of other problems.  So what's the solution?

The solution is a contraption called a go-bar deck.  Lots of lute makers and guitar makers use them, and they are a miracle.  Not the simplest thing to use--it gets to be quite a forest in there toward the end of the job, and the one thing you do not want to do is accidentally nudge one of those sprung bars--but once you are ready to start the job, it's pretty much guaranteed that in an hour or so you'll be done, and all the bars will be glued on at the correct humidity.  Here's what it looks like, fully-loaded, all bars glued and stuck down, held in place by flexible bars made of red oak.  (My glue pot on the hot plate is just on the left.)


Here's a closer shot:


And one from the back side, showing a better view of the belly and bars.


This go-bar deck was kindly lent to me by Grant Tomlinson. (His workshop is just down the hall--we'll go visit him and see what he's been up to in a future post.)


So that's another big job done.  I'll leave it to dry overnight, then next morning carefully remove the go-bars and set the belly aside.  Then later on in the afternoon, I'll glue the bars on the next belly... and the next day, glue the bars on the third. 

Here's what one of the finished products looks like--this is the 13 course belly with bars glued on, just after coming out of the go-bar deck.  The bars still need to be trimmed and given a final shape, then the belly will be fitted into the body.  Exciting stuff coming up!  See you next time...


Saturday, 12 March 2011

My February

Ah, February, the longest, shortest, dreariest, happiest month.  How did you spend your February?  Were you on a beach in some sunny place, trying your best to forget the frozen misery back home?  Or did you bar the door, curl up by the fire and pluck your lute by the flickering light?

I must admit I did some of the latter in my February (though there was no actual fireplace involved--only the warmth and light of my lovely bride Julia).  In the lute shop, I carved.  I also planed, and sawed, and scraped, and drilled (and occasionally swept the floor); but mostly, I carved.

I selected three of my best soundboards, planed and scraped them to an appropriate thickness, and then in each of them I carved a rose.  Have a look.


This is the rose I carved for the 8 course lute.  Like all of the lute rose patterns I use, it's an historical pattern, and it's from an archlute of 1639 by Matteo Sellas.  (This version of the pattern was drawn by Ray Nurse).   I hadn't carved this pattern before, but I was eager to do it--I really like the balance of space and substance, and the combination of geometric and organic elements.


This is the rose for the 13 course Schelle lute.  It is not the pattern that appears on the original Paris Schelle (that rose is actually carved from a separate piece of pear wood, and then inset into the belly of the lute).  Instead, this rose is a version of the "knot of leonardo" pattern that appears--in different sizes, and with and without the decorative chip-carved border--on many surviving old instruments.

 
And here is the rose for the 11 course Warwick Frei.  This is the pattern from the original Frei lute, and it is one of a kind--the only surviving historical lute on which this rose pattern appears.  No wonder!  The small lace-or web-like elements are quite painstaking to cut.  Indeed, there's such a combination of different things going on in this pattern--large and small bits, vines, webs, fleurs-de-lis, geometric elements--that it's kind of amazing that the pattern 'works' at all.  And yet it does... To me, there's something in this rose that feels very old, very fundamental, even archetypal.  It brings a shiver.

Perhaps you can tell that I really, really enjoy carving a lute rose.  It's true.  However, like practically all the thousand-and-one jobs involved in making a lute, I am happy while I am doing it, but I am happy when it's done.  I can set the work aside, clear the bench, sharpen my tools, and go on to the next job.

The next job, as it turns out, is to make bridges.  The bridges for these lutes are all made of plum (my preferred wood for this piece of equipment), but each bridge is made in a separate style with its own distinct features.

The 8 course bridge is a design after Tieffenbrucher, dyed black with incised lines and branded with six-petalled flowers.
The 11 course design is from a lute by Vendelinus Tieffenbrucher, dyed black with incised lines and branded with eight-petalled flowers.  It will also have ebony tips added once it's glued to the soundboard.
And finally, the 13 course bridge is based on the bridge from the Paris Schelle--this one isn't dyed black, but has an ebony cap (and it will also have ebony tips).
So there, that's most of my February.  I also did plenty of other stuff (But Travis, I hear you exclaim, how much more can a single human being do in one month?), but that's the most spectacular.  Much work in building a lute is done behind the scenes and does not reveal itself until later.  All will be revealed in the fullness of time....

Monday, 7 March 2011

The Three Amigos

"The Three Amigos" refers to the batch of three lutes that I'm working on right now, though I can't say for sure that they are actual amigos.  I'm just assuming so, because I haven't heard any squabbling; during the day, at least, when I'm around, they appear to be on friendly enough terms... hanging around, one behind the other, patiently waiting for me to give them their shape...

The one nearest is (or will eventually become) a 13 course lute after Sebastian Schelle (in the Paris Conservatoire);

The one in the middle is an 11 course lute after Hans Frei (in the Warwick County Museum);

And the one farthest away, closest to the wall, is an 8 course lute after Magno Tieffenbrucher (C45, in the Vienna KHM).

I began putting these lutes together in the beginning of November, 2010.  The backs were finished before Christmas; the necks were fitted, shaped, veneered with ebony, then glued up to the body, in January.  (If you want to find out what I was up to in February, tune in for the next installment.)


Here's the Schelle.  It has 9 ribs of Indonesian rosewood, with holly spacers.  As you can see, this wood has a pretty spectacular streaking, which makes a nice match with the holly.  The neck is mahogany, with an ebony veneer; this makes the neck very strong, stable and lightweight.  (The light-coloured strip you see along the edge of the neck is just a piece of masking tape to protect the veneer edge from damage--and to protect my hands from the razor-sharp ebony when I'm handling the lute.)


Here is the 11 course Frei--the back has 11 ribs
of eastern hard curly maple.  This wood has a very lovely blond colour and an interesting curl, and I'm quite looking forward to bringing that out during the varnishing stage.


And here is the 8 course Tieffenbrucher.  This has 17 heartwood yew ribs, with holly spacers, and again, an ebony veneered neck.  I'm quite interested in this lute, because it's a new model I've wanted to develop for a long time.  It's a bit scaled-down from the original C45--I had originally made the mold for a 10 course lute that could be tuned in low-pitch g'.  This 8 course version will have a string length of 62.5 cm, so it can be tuned in modern-pitch g', and it will have 9 tied frets.


Here are three more views.   (Please disregard the bits of masking tape at the ends of the capping strips--they are merely part of the system used to check the angle of the neck, and eventually to set the action/ stringheight of the finished lute.)

Saturday, 5 March 2011

Welcome to the lute shop

Hello everyone, and welcome to my lute making workshop in Vancouver.  I'm not exactly sure where to begin, so maybe I'll show you around the workshop a little--then we can have a look at the work in progress.
First, the building at 8696 Barnard Street.  Kind of an unassuming place, but there's a lot going on here.  At least three lute makers have work spaces in the building, and I would think that such a concentration of lute making energy hasn't occurred too many times, and in too many places, since Magno Tieffenbrucher and company were churning them out way back when.  There are also many other craftspeople and artists in the building, as well as carpenters, cabinetmakers, and a masonry company.  In all, it's a good mix of people and occupations, there's a good vibe in the place, and I could not be happier going to make lutes there every day.

I'm in 207, a rather...compact space on the south side.  Come on in!

Here's my main work bench (at the moment I'm preparing sets of soundboard bars for the lutes under construction)....

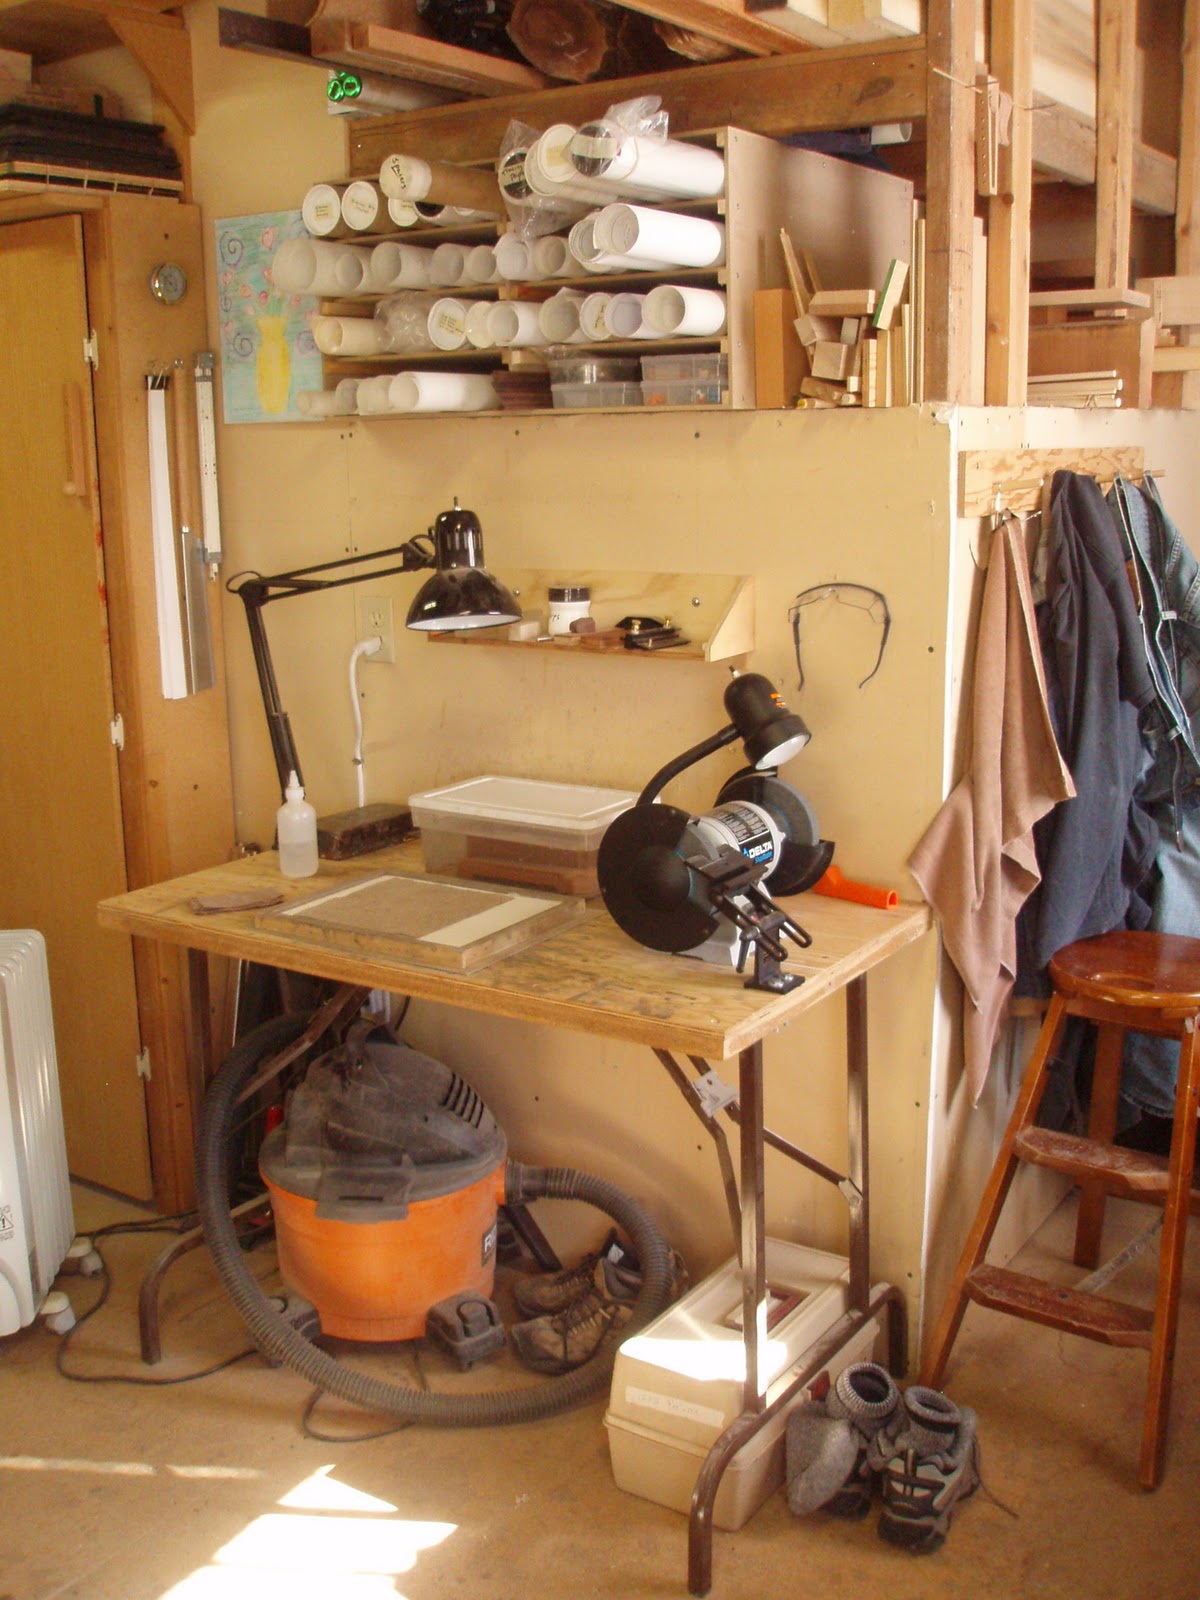
Sharpening station....


And the drafting table--along with the current crop of lutes.  I'll introduce you to each of them next time.


As you can see, it's a sunny little place, a nice spot to get some work done.  Most of the time I have no problem motivating myself, but should I ever linger a bit too long over lunch, or leafing through the latest Lute Society Quarterly, I have a gentle reminder to keep me in line: